Writing a Plugin for Kong API Gateway 0.14.x
Step-by-step instructions on how to create your first plugin for Kong

Introduction
I've been exploring Kong API Manager CE a lot this past month. If you're not familiar, Kong is an incredibly flexible open sourced API Gateway. Two things about Kong really excite me from an engineer's perspective:
- Once it's deployed, you use the Admin API to create and configure services, routes, plugins, etc. This is a RESTful API that makes configuration very simple.
- It heavily supports plugins, so you can define custom functionality to interact with requests and responses that pass through the gateway by building a plugin.
The first point is exicting in its own right, but in this post I'm going to cover the second point.
Plugins in Kong can serve many different functions, but in essence they are modules of code that run at different parts of the request/response lifecycle. If you'd like to see what kind of thing you can accomplish with Kong plugins, check out the ones that are currently available.
Overview
In this post, we will create a simple header echo plugin. Here's an example of how it should work:
- Request:
$ curl -i http://localhost:8000/mock/request -H 'Host: mockbin.org' -H 'X-Request-Echo: Hello, world' - Response: contains the header
'X-Response-Echo: Hello, world'
There are going to be quite a few pieces to this tutorial, so let's check out a diagram before we dive any deeper:
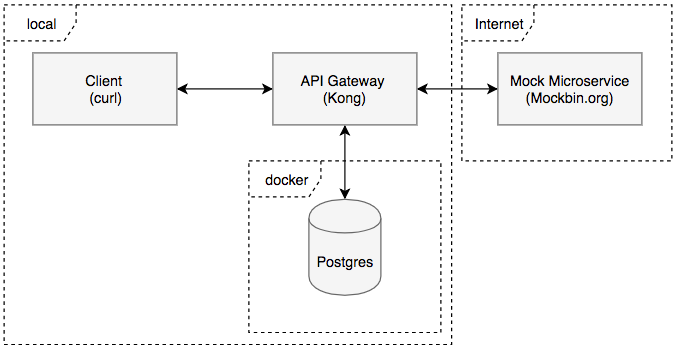
Here is a brief description of these components:
- Client (curl) - We will use the curl command line tool to represent a client sending HTTP requests to Kong.
- API Gateway (Kong) - An instance of Kong running locally, functioning as an API gateway. This will be proxying requests from the Client to and from the Mock Microservice. In addition, it will be running the header echo plugin that we will develop. The plugin will get the value of the custom request header, store it in memory, then forward the request on to the upstream service (mockbin.org). When the upstream service returns, the plugin will add a header to the response using the value we stored in memory during the request.
- Postgres - Postgres is used here as a backend datastore for Kong. It holds information like what services, routes, consumers, and plugins are configured. It also contains our plugin's configuration. This will be running in a Docker container.
- Mocked Microservice (Mockbin.org) - We will have a mock microservice using mockbin.org. This will give us an API that we can receieve canned responses from.
Setting up the Database
First, let's get the backend database up and running. I'm assuming you've already installed Docker:
# Stand up Postgres Datbase
$ docker run -d --name kong-database \
  -p 5432:5432 \
  -e "POSTGRES_USER=kong" \
  -e "POSTGRES_DB=kong" \
  postgres:9.6

# Run the migrations
$ docker run --rm \
  -e "KONG_DATABASE=postgres" \
  -e "KONG_PG_HOST=kong-database" \
  kong kong migrations up
When you run $ docker ps you should see the kong-database container running.
Running Kong
Next, let's setup Kong. I'm assuming you've already installed Kong:
- Get the
kong.conffile from this gist and save it to your Desktop - Run Kong:
$ kong start -c /path/to/kong.conf
- Verify Kong is running. To do this we will call
localhost:8001. Port 8001 is where the Admin API listens for HTTP traffic by default:
$ curl http://localhost:8001 | python -mjson.tool
If everything has gone well so far, you should see something like the following response:
{
    "plugins": {
        "enabled_in_cluster": [],
        "available_on_server": {
            "response-transformer": true,
            "oauth2": true,
            "acl": true,
            "correlation-id": true,
            "pre-function": true,
            "jwt": true,
            "cors": true,
            "ip-restriction": true,
            "basic-auth": true,
            "key-auth": true,
            ...
        }
    },
    "tagline": "Welcome to kong",
    ...
}
Adding a Service and Route to Kong
Next, let's setup a service on Kong for our mock microservice. Again, we're calling the Admin API on port 8001:
$ curl -X POST \
  --url "http://localhost:8001/services/" \
  --data "name=mock-service" \
  --data "url=http://mockbin.org" \
  | python -mjson.tool
You should get a response like the following:
{
    "host": "mockbin.org",
    "created_at": 1537073576,
    "connect_timeout": 60000,
    "id": "4ecbe361-8dad-46fb-a6ab-13f3353c9805",
    "protocol": "http",
    "name": "mock-service",
    "read_timeout": 60000,
    "port": 80,
    "path": null,
    "updated_at": 1537073576,
    "retries": 5,
    "write_timeout": 60000
}
To get to the backend service, we'll need to add a route to the service:
$ curl -X POST \
    --url "http://localhost:8001/services/mock-service/routes" \
    --data "hosts[]=mockbin.org" \
    --data "paths[]=/mock" \
    | python -mjson.tool
You should get a resopnse like this:
{
    "created_at": 1537073975,
    "strip_path": true,
    "hosts": [
        "mockbin.org"
    ],
    "preserve_host": false,
    "regex_priority": 0,
    "updated_at": 1537073975,
    "paths": [
        "/mock"
    ],
    "service": {
        "id": "4ecbe361-8dad-46fb-a6ab-13f3353c9805"
    },
    "methods": null,
    "protocols": [
        "http",
        "https"
    ],
    "id": "6edb8a0b-2f88-416d-a1a7-f9df6b0b9ebf"
}
If you've setup everything correctly so far, you should be able to call the proxy (on port 8000, not 8001!!!) like this:
$ curl http://localhost:8000/mock/request -H 'Host: mockbin.org'
And get a response from your mock microservice, through the Kong API gateway:
{
  "startedDateTime": "2018-09-16T04:59:53.275Z",
  "clientIPAddress": "127.0.0.1",
  "method": "GET",
  "url": "http://mockbin.org/request",
  "httpVersion": "HTTP/1.1",
  "cookies": {},
  "headers": {
    "host": "mockbin.org",
    ...
  },
  ...
}
Creating the Header Echo Plugin
Kong plugins are written using the Lua programming language. Since most of Kong itself is written in Lua, it logically follows that custom plugins are written in Lua as well. Lua isn't the most popular language out there, but in short, it's dynamically typed and quite elegant so you should be able to grok the code if you come from a Python or JavaScript background.
The simplest Kong plugin will contain at least the following structure:
kong-plugin-header-echo/
├── kong
│   └── plugins
│       └── kong-plugin-header-echo
│           ├── handler.lua                   # Code to interact w/ req/res
│           └── schema.lua                    # Configuration options
└── kong-plugin-header-echo-0.1.0-1.rockspec  # The project definition
Go ahead and setup this directory structure on your Desktop:
$ mkdir -p kong-plugin-header-echo/kong/plugins/header-echo/
$ touch kong-plugin-header-echo/kong/plugins/header-echo/handler.lua
$ touch kong-plugin-header-echo/kong/plugins/header-echo/schema.lua
Finally, we'll generate a template for the rockspec using luarocks. luarocks is the package manager for the Lua programming lanague. It comes with Kong. Packages and libraries managed by luarocks are referred to as "rocks" in Lua. In this case, our rockspec file is a document detailing what our plugin is, including where the repository is located, and what dependencies the plugin needs to run. Run the following commands to generate a template file and rename it:
$ luarocks write_rockspec
$ mv kong-plugin-header-echo-scm-1 kong-plugin-header-echo-0.1.0-1.rockspec
Next, open the file and change the "version" on line 2 to "0.1.0.-1".. Save and exit. If you're familiar with semantic versioning, this should look familiar, yet odd, because of the trailing -1. If you're asking yourself what that's for, it is used to denote the version of the rockspec file within the version of the project as a whole.
You should include a README.md file in the root of your directory as well, but we'll skip that for berevity's sake. Go ahead and open up the project in your editor of choice. I like Sublime:
$ subl kong-plugin-header-echo
Creating the Schema
Now we're going to define our plugin's schema, represented by the schema.lua file. The Kong documentation describes the purpose of this file as so:
your plugin probably has to retain some configuration entered by the user. [The schema] module holds the schema of that configuration and defines rules on it, so that the user can only enter valid configuration values.
So our schema.lua file has two jobs: define the user configuration for our plugin, and define what a valid configuration consists of. This will be the content of our file.
return {
  no_consumer = true, -- This means our plugin will not apply to specific service consumers
  fields      = {
    requestHeader = {
      type     = "string",
      required = false,
      default  = "X-Request-Echo"
    },
    responseHeader = {
      type     = "string",
      required = false,
      default  = "X-Response-Echo"
    }
  }
}
This code is merely returning a data structure. If you're from a JavaScript background you can think of this as a JSON object, but in Lua, it's considered a table (which is interestingly enough the only data structure supported by the language). Regardless of what it's called, it might not be obvious how this plugs into the greater picture of what we're doing at the moment. Let's take a step back and talk about how you add and configure plugins to a service in Kong.
Detour: Adding and Configuring Kong Plugins
Like mosts tasks in Kong, adding and configuring plugins is done through the Admin API. You can find the documentation for this here. We'll see how to add a plugin at the end, when we're completed with developing ours, but for now, you should know that there are three different attributes that we need to consider when adding a plugin to Kong through the Admin API: name, consumer_id, and config.{property}.
name- this refers to the name of the plugin. For the plugin we're creating, this would bekong-plugin-header-echoconsumer_id- this is the identifier of the service consumer for which this plugin will apply if applicable.config.{property}- this represents any number of required or optional properties that the plugin uses to configure itself. The names of these properties map directly to thefieldskey in the table returns fromschema.lua. For example, we might specify the requestHeader config asconfig.requestHeader="X-Echo-This"
Creating the Handler
Finally, we're going to create the handler. The handler.lua file is where the logic of the plugin resides. This is the code that inspects and/or modifies the requests and responses to and from the client and the upstream service. It can perform any arbritrary logic from authorization, to logging, to access control, to routing. Kong describes the job of this file like so:
the core of your plugin. It is an interface to implement, in which each function will be run at the desired moment in the lifecycle of a request.
handler.lua is an implementation of an interface, BasePlugin. Different methods of the interface are associated with different points in the request/response lifecycle. In our case, we want to inspect the request for a certain header before it reaches our mock service, and then modify the headers before the response reaches the client. To perform the former, we will use BasePlugin:access, and to do the latter, we will use BasePlugin:header_filter.
Populate your hander.lua file with the following code:
local BasePlugin = require "kong.plugins.base_plugin"

local EchoHandler = BasePlugin:extend()

EchoHandler.PRIORITY = 2000
EchoHandler.VERSION = "0.1.0"

function EchoHandler:new()
  EchoHandler.super.new(self, "kong-plugin-header-echo")

  self.echo_string = ""
end

-- Run this when the client request hits the service
function EchoHandler:access(conf)
  EchoHandler.super.access(self)

  -- kong.* functions are from the PDK (plugin development kit)
  -- and do not need to be explicitly required
  self.echo_string = kong.request.get_header(conf.requestHeader)
end

-- Run this when the response header has been received
-- from the upstream service
function EchoHandler:header_filter(conf)
  EchoHandler.super.header_filter(self)

  if self.echo_string ~= "" then
    kong.response.set_header(conf.responseHeader, self.echo_string)
  end
end

return EchoHandler
Adding our Plugin to Kong
To run our plugin, we first need to inform Kong of its presence using the kong.conf file that we created earlier. Open it up, search for plugins, and add our plugin. The line should look like this:
plugins = bundled, kong-plugin-header-echo
Then save and exit the file. Finally, cd to the root directory of your plugin and run:
$ kong start -c /path/to/your/kong.conf
To verify that Kong knows about your plugin, execute the following command:
$ curl http://localhost:8001/ | python -mjson.tool
You should see your plugin in the plugins.available_on_server array! We're not out of the woods yet but we're almost there. Now that Kong knows about our plugin, we need to activate it using the Admin API. To do so, run the following command:
$ curl -X POST \
    --url "http://localhost:8001/services/mock-service/plugins" \
    --data "name=kong-plugin-header-echo" \
    | python -mjson.tool
You should see the following response (notice the requestHeader and responseHeader configs were set to their default values):
{
    "created_at": 1537080281000,
    "config": {
        "requestHeader": "X-Request-Echo",
        "responseHeader": "X-Response-Echo"
    },
    "id": "e173ab1b-8094-4ab8-bcda-326bcbc46198",
    "enabled": true,
    "service_id": "4ecbe361-8dad-46fb-a6ab-13f3353c9805",
    "name": "kong-plugin-header-echo"
}
Now for the moment of truth! Run the following command (remember, we're hitting the proxy, not the Admin API, so use port 8000, not 8001):
$ curl -i http://localhost:8000/mock/request -H 'Host: mockbin.org' -H 'X-Request-Echo: Hello, world'
And you should get the following back:
HTTP/1.1 200 OK
Content-Type: application/json; charset=utf-8
Content-Length: 1010
Connection: keep-alive
Date: Sun, 16 Sep 2018 14:55:28 GMT
...
X-Response-Echo: Hello, world

...
{
  "startedDateTime": "2018-09-16T14:55:28.135Z",
  "clientIPAddress": "127.0.0.1",
  "method": "GET",
  ...
}
Conclusion
This is really just the tip of the iceberg as far as what you can do with plugins in Kong. Creating and running plugins turns out to be pretty simple: You code your plugin, let Kong know where it is, add the plugin via the Admin API, and you're set. That said, there were certainly a couple pain points for me here. First, where Kong looks for plugins is still a bit confusing, which is why I asked you to cd into the root directory of your plugin before running kong start .... You certainly can modify your lua_package_path in your kong.conf file, but the instructions in the plugin documentation make it seem like running luarocks install ... will create the plugin in a directory that Kong can reach by default. Second, I had no experience with Lua before I started with Kong. Now, Lua is a very simple language, and since I had experience with Python and JavaScript, the learning curve was fairly shallow. However, with no direct support for Object-Oriented programming, one of the things I struggled with was determining where to store the state for echo_string. But overall, Lua is a pleasure to work with. All that said, developing my first plugin for Kong was a fun experience, especially coming from a Mule background, where the out-of-the-box API Gateway solution is closed-source and a black box. If you're on the market for an API Gateway, you should give Kong some serious consideration. If you'd like to learn more about Kong and how it works, their FAQ is a great place to start.
You can find the complete code for the plugin on my GitHub here.