Securing APIs with Kong and Keycloak - Part 2
Part II: Learn how to configure a Kong API Gateway with the OIDC Plugin and Keycloak to secure your APIs.

Introduction
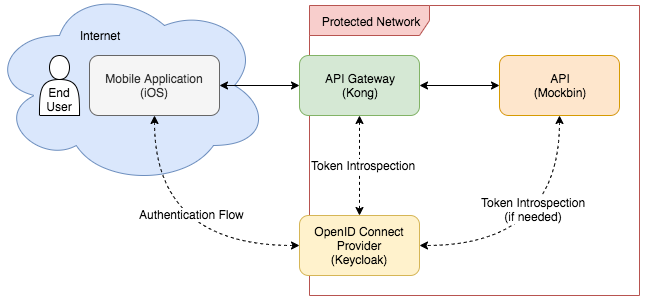
In Part 1 of this post we set up Kong and Keycloak so that we could protect our backend APIs using OpenID Connect. Currently, when end users try to hit one of the backend services through Kong using a web browser, the end user is required to authenticate with Keycloak first before the request is allowed through. In this post, we will take care of the additional necessary configuration to get this working for mobile applications.
Assumptions
Here are the assumptions, again:
- You've completed the steps in Part 1
- Running on Mac, or Linux (though this can all be adopted for Windows easily enough since we're using Docker).
- Mobile app is iOS, so you will need xCode. If you'd like to see an Android version of this, please leave a comment below stating so.
- You're familiar with the terminal, and understand how
curland pipes work - Docker Compose is installed
- (Optional) jq is installed
Overview
As a reminder, here's what we're trying to accomplish:
Let get to it.
The Mobile App
This post will be focusing on configuring a mobile app, Kong, and Keycloak to play well together using OIDC.
Instead of building our own app from scratch to test the OIDC functionality on Kong, we're going to use one provided by folks behind AppAuth and modify that. Go ahead and pull their code down from GitHub:
$ git clone https://github.com/openid/AppAuth-iOS.git
$ cd AppAuth-iOS/Examples/Example-iOS_Swift-Carthage/
We're not going to use Carthage for this. Make sure you have Cocoapods installed ($ sudo gem install cocoapods).
$ rm Cartfile
$ pod init
Next, add AppAuth and Alamofile to the Podfile:
platform :ios, '12.1'

target 'Example' do
  use_frameworks!

  pod 'AppAuth'
  pod 'Alamofire'
end
Install the pods
$ pod install
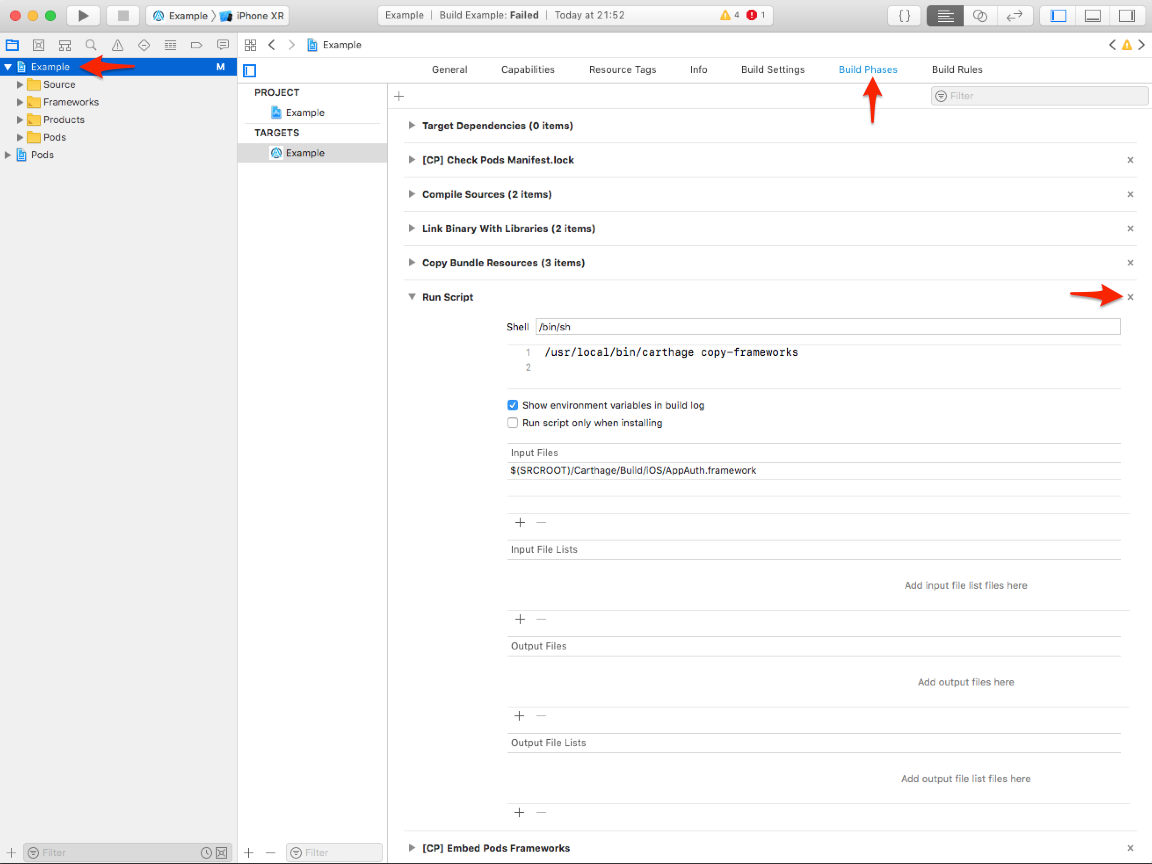
Open up the project in Xcode by opening up the project directory in Finder and double-clicking the "Example.xcworkspace" file (if you're a terminal junkie, you can run $ open Example.xcworkspace to get the same results). To get rid of all the Carthage parts of our project and avoid the "Command PhaseScriptExecution failed with a nonzero exit code" (incredibly descriptive, and helpful, I know) we need to delete part of the build. Click on the root of the project and click the tab "Build Phases". Delete the "Run Script" and you should be good to go!
Authenticating
Open the "AppAuthExampleViewController.swift" file. There are just a few things we need to do in order to get a working prototype. First, we will need to modify the kIssuer, kClientID, and kRedirectURI fields. Our issuer in this case is Keycloak, more specifically, the master realm, so we will change our kIssuer to be http://localhost:8180/auth/realms/master. For our kClientID, we'll choose iosapp.
Before we modify the kRedirectURI, we should discuss it a bit. You'll notice that this redirect uri is nothing like the one we gave for the Kong client back in Part 1. As it turns out, for the authentication flow that our mobile app will go through, the redirect URI shouldn't be used to redirect. Remember, we don't want to request a resource, be redirected to authenticate, then be redirected to the resource. Instead, we want to authenticate, then just directly request a resource. So for our purposes, the redirect URI is just another security measure. When we pass it to Keycloak during the authentication flow, it will check to make sure it matches up with the valid redirect URIs that we provide it. So for now, let's set our kRedirectURI to iosapp://fake.url.here/auth to make it obvious this isn't really for redirect purposes.
Next we need to make some modifications to the "Info.plist" file:
- Make sure
iosappis included in theCFBundleURLSchemes - Make sure our app can communicate with HTTP instead of HTTPS
For the first task, we will modify the CFBundleURLSchemes from com.example.com to iosapp. For the second task, we will add the following to bottom of our "Info.plist" file, right before the closing </dict> tab.
<key>NSAppTransportSecurity</key>
<dict>
    <key>NSExceptionDomains</key>
    <dict>
        <key>localhost</key>
        <dict>
            <key>NSIncludesSubdomains</key>
            <true/>
            <key>NSTemporaryExceptionAllowsInsecureHTTPLoads</key>
            <true/>
        </dict>
    </dict>
</dict>
<key>NSAllowsArbitraryLoads</key>
<true/>
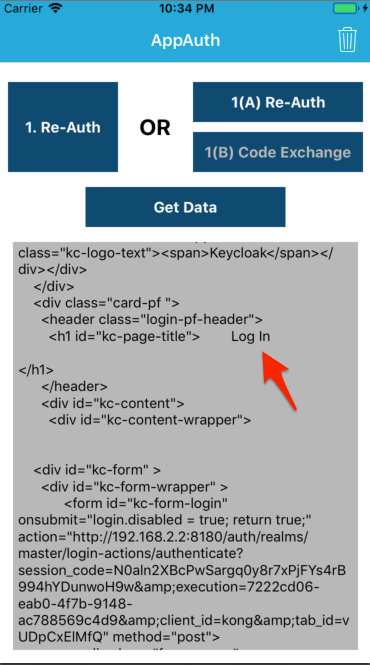
Go ahead and launch the app. When it loads, click the "Auto" button. Then when the alert apears, click the "Continue" button.
Unfortunately, you'll see something like this:
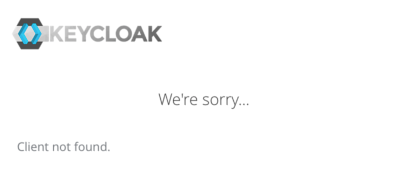
This is because we've tried to authenticate with Keycloak using the iosapp client, but that client has not been registered with Keycloak, yet. Therefore, Keycloak has rightfully rejected the request for authentication all together. Let's fix this issue. Open up Keycloak (http://localhost:8180/auth), authenticate, and click the "Clients" tab on the left sidebar. Then, click the "Create" button on the right side of the screen.
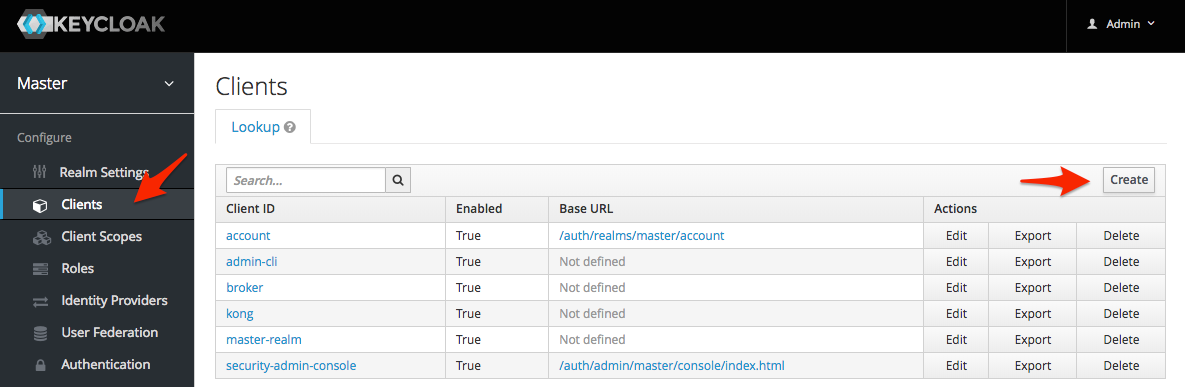
On the next screen, enter the "Client ID" as "iosapp" and click the "Save" button.

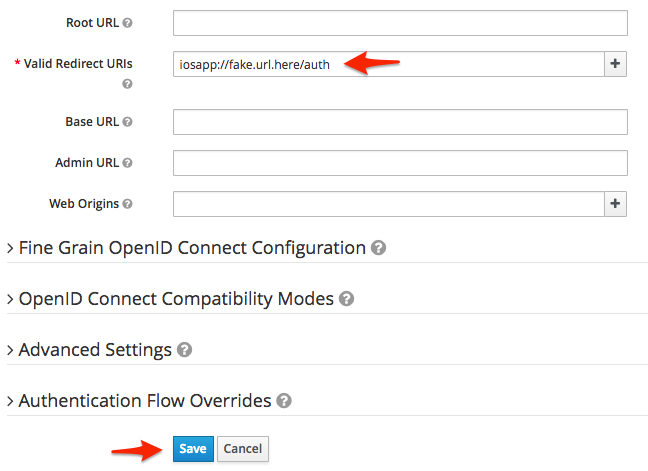
On the next screen scroll towards the bottom and enter "iosapp://fake.url.here/auth" as one of the "Valid Redirect URIs" and click the "Save" button.
And that should do it!
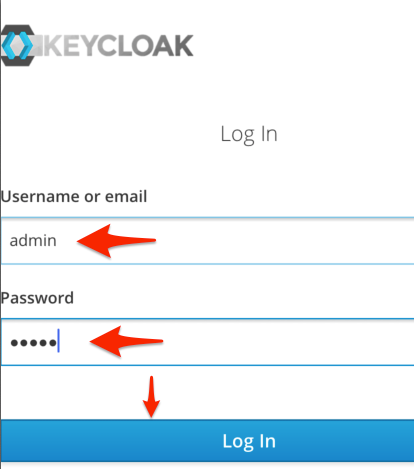
Go back to Xcode and give the authentication another shot. You should now see that you see that you actually get a login screen. Enter the credentials you use to log into Keycloak and press the "Log In" button.
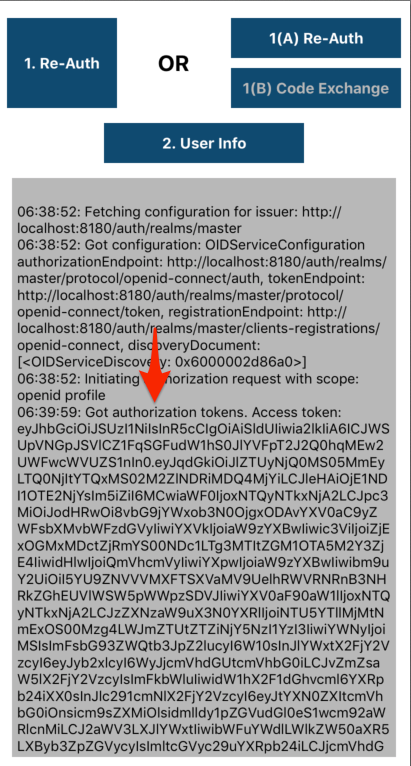
When your app navigates back to the main page, you should the Text View populated with your new Access Token!
Making Requests with Access Tokens
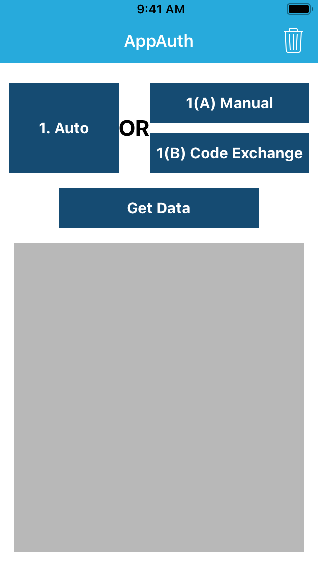
Now that we've managed to get an access token from Keycloak, we need to use it in our requests to our backend APIs through Kong. We'll chop up the existing UI a bit, and use Alamofire to accomplish this. Open the "Main.storyboard" file in Xcode and re-label the "Get Info" button to say "Get Data" instead.
Next, on line 220 of the "AppAuthExampleViewController.swift" file, we're going to delete the entire body of the userinfo method, but not the method itself.

This is where we will place our code to make our request via Alamofire. First, add import Alamofire under import UIKit on line 20. Then add the following code to the userinfo method:
if let authState = self.authState {
    authState.performAction(freshTokens: { (accessToken, refreshToken, error) in
        let headers : HTTPHeaders = ["Accept":        "application/json",
                                     "Authorization": "Bearer \(accessToken!)"]

        print("Headers are \(headers)")

        Alamofire.request("http://localhost:8000/mock", method: .get, headers: headers).responseString { response in
            if let json = response.result.value {
                self.logMessage("Result of HTTP request: \(json)")
            } else {
                self.logMessage("Error with HTTP request")
            }
        }
    })
} else {
    print("Tried to issue request, but authState was invalid")
    self.logMessage("authState is invalid. Did you authenticate?")
}
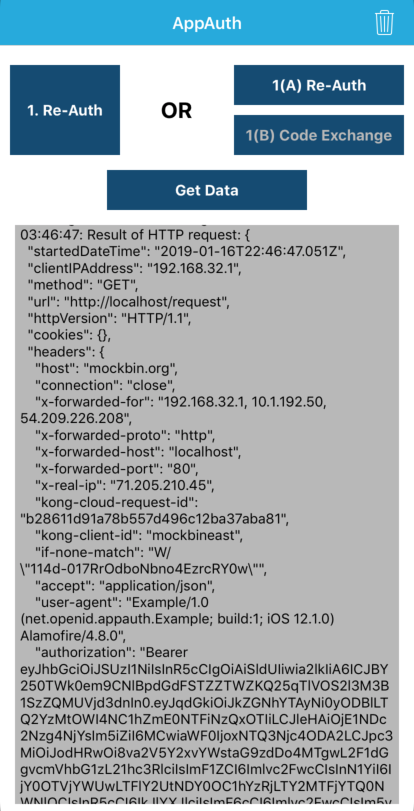
Now we can make requests with our access token! Run the project, authorize yourself, and then click the "Get Data" button. Aaaaaaaand prepare to be disappointed. If you scroll towards the bottom of the text view, you'll see we're getting back HTML from Keycloak (routed through Kong) again but this time... it's the login page
But didn't we just log in? What's going on?
Gotcha
To get a better idea of what's going on, we're going to look at the Kong debug logs. Add the following to the environment: section of kong service in your "docker-compose.yml" file:
KONG_LOG_LEVEL: debug
Then restart the container
$ docker-compose stop kong
$ docker-compose up -d kong
Run through the previous mobile app flow of requesting a token, and then making a request with that token. After you're done, open up the Kong logs.
$ docker-compose logs -f kong
You'll see two areas of interest, here:
[lua] handler.lua:46: make_oidc(): OidcHandler calling authenticate, requested path: /mock
...
[lua] openidc.lua:1203: authenticate(): session.present=nil, session.data.id_token=false, session.data.authenticated=nil, opts.force_reauthorize=nil, opts.renew_access_token_on_expiry=nil, try_to_renew=true, token_expired=false
kong_1         | 2018/11/19 05:39:06 [debug] 29#0: *717 [lua] openidc.lua:1228: authenticate(): Authentication is required - Redirecting to OP Authorization endpoint
Kong is trying to authenticate us, then turning around and saying that authentication is required, even though we just authenticated with Keycloak. When we were working with the browser, we authenticated with Keycloak and got the resource we were looking for just fine. So what's happening here?
This is happening for a combination of reasons. The first hint is session.present=nil in the logs. If you're familiar with how sessions work, this should be fairly obvious, but if not, you can think of a session as the mechanism through which a server remembers who a particular client is. In the case of the browser authentication, we hit Kong directly, which created a session. All of our subsequent requests to Kong from that browser were automatically authenticated because Kong knew who we were, and that we'd authenticated in the recent past. The situation with our mobile app is a bit different though. We first authenticate against Keycloak directly, never involving Kong, then we hit Kong and it has no session stored for us. It's like we just showed our boarding pass and ID to the TSA agent before we hit the security screening, then try to walk right past the screening, asking a completely different agent, "You don't remember me from back there?"
If you're a keen reader, you're probably thinking "we use the access token so the server doesn't need to maintain state about the clients. Why didn't Kong try to use the access token we sent?". Now we're getting somewhere. This has to do with how the kong-oidc plugin, and its dependency, the lua-resty-openidc library.
The lua-resty-openidc library has two methods of interest to us. First, there's authenticate. authenticate is the method that has been called everytime we've tried to hit a backend service up to this point. And it's been great! The only problem is, authenticate doesn't check if you've provided an access token and try to verify it. To do that, we need the introspect method. Let's take a step back and look at how the kong-oidc plugin is handling our request:
function handle(oidcConfig)
  local response
  if oidcConfig.introspection_endpoint then
    response = introspect(oidcConfig)
    if response then
      utils.injectUser(response)
    end
  end

  if response == nil then
    response = make_oidc(oidcConfig)
    if response and response.user then
      utils.injectUser(response.user)
    end
  end
end

function make_oidc(oidcConfig)
  ngx.log(ngx.DEBUG, "OidcHandler calling authenticate, requested path: " .. ngx.var.request_uri)
  local res, err = require("resty.openidc").authenticate(oidcConfig)

...

function introspect(oidcConfig)
  if utils.has_bearer_access_token() or oidcConfig.bearer_only == "yes" then
    local res, err = require("resty.openidc").introspect(oidcConfig)
...
Notice something? The introspect endpoint is only called if oidcConfig.introspection_endpoint is set. In this particular plugin, we set that as a configuration when we create the plugin. Let's see if we've set it:
$ curl -s http://localhost:8001/plugins | grep introspection_endpoint
$
Doesn't look like it. Let's go ahead and do that. To find the introspection endpoint, you can use jq to get it from the discovery endpoint for Keycloak like this:
$ LOCAL_IP=192.168.2.2 # Replace with yours
$ curl -s http://${LOCAL_IP}:8180/auth/realms/master/.well-known/openid-configuration \
    | python -mjson.tool \
    | jq -r .data[0].config.introspection_endpoint
http://192.168.2.2:8180/auth/realms/master/protocol/openid-connect/token/introspect",
Great, let's add that to the kong-oidc plugin:
$ PLUGIN_ID=$(curl -s http://localhost:8001/plugins | jq -r .data[0].id
$ curl -X PATCH http://localhost:8001/plugins/${PLUGIN_ID} \
    -d config.introspection_endpoint=http://192.168.2.2:8180/auth/realms/master/protocol/openid-connect/token/introspect
    | python -mjson.tool
Make sure you replaced 192.168.2.2 with your local IP address in the above commands
Now, Kong should try to validate an access token (if provided) before it tries to send us to authenticate. Let's give it a shot. Launch your mobile app, authentication, and request data from the API again.
Ugh. Same result! Let's check the logs again. Some areas of interest:
[lua] openidc.lua:392: openidc_call_token_endpoint(): request body for introspection endpoint call:...
[lua] openidc.lua:409: openidc_call_token_endpoint(): introspection endpoint response: {"active":false}
[lua] openidc.lua:1228: authenticate(): Authentication is required - Redirecting to OP Authorization endpoint
So Kong is trying to verify our token instead of calling authenticate, but it's failing, so it's calling authenticate anyway. We're heading in the right direction.
Gotcha, AGAIN!
Let's dig into this a bit. If we recall the error we received from openidc.lua, introspection endpoint response: {"active":false}, we can get a clue. The introspection of the token is working, but Kong is telling us that the token is not active. To investigate this further, let's use the terminal to get our own access token, then try to use that to authenticate. First, however, we need to temporarily enable service account usage for the kong client. To do this:
- Login to Keycloak (
http://localhost:8180/auth/admin) - Click the "Clients" link in the sidebar
- Select the "kong" client.
Finally, make sure "Service Accounts Enabled" is set to "ON"
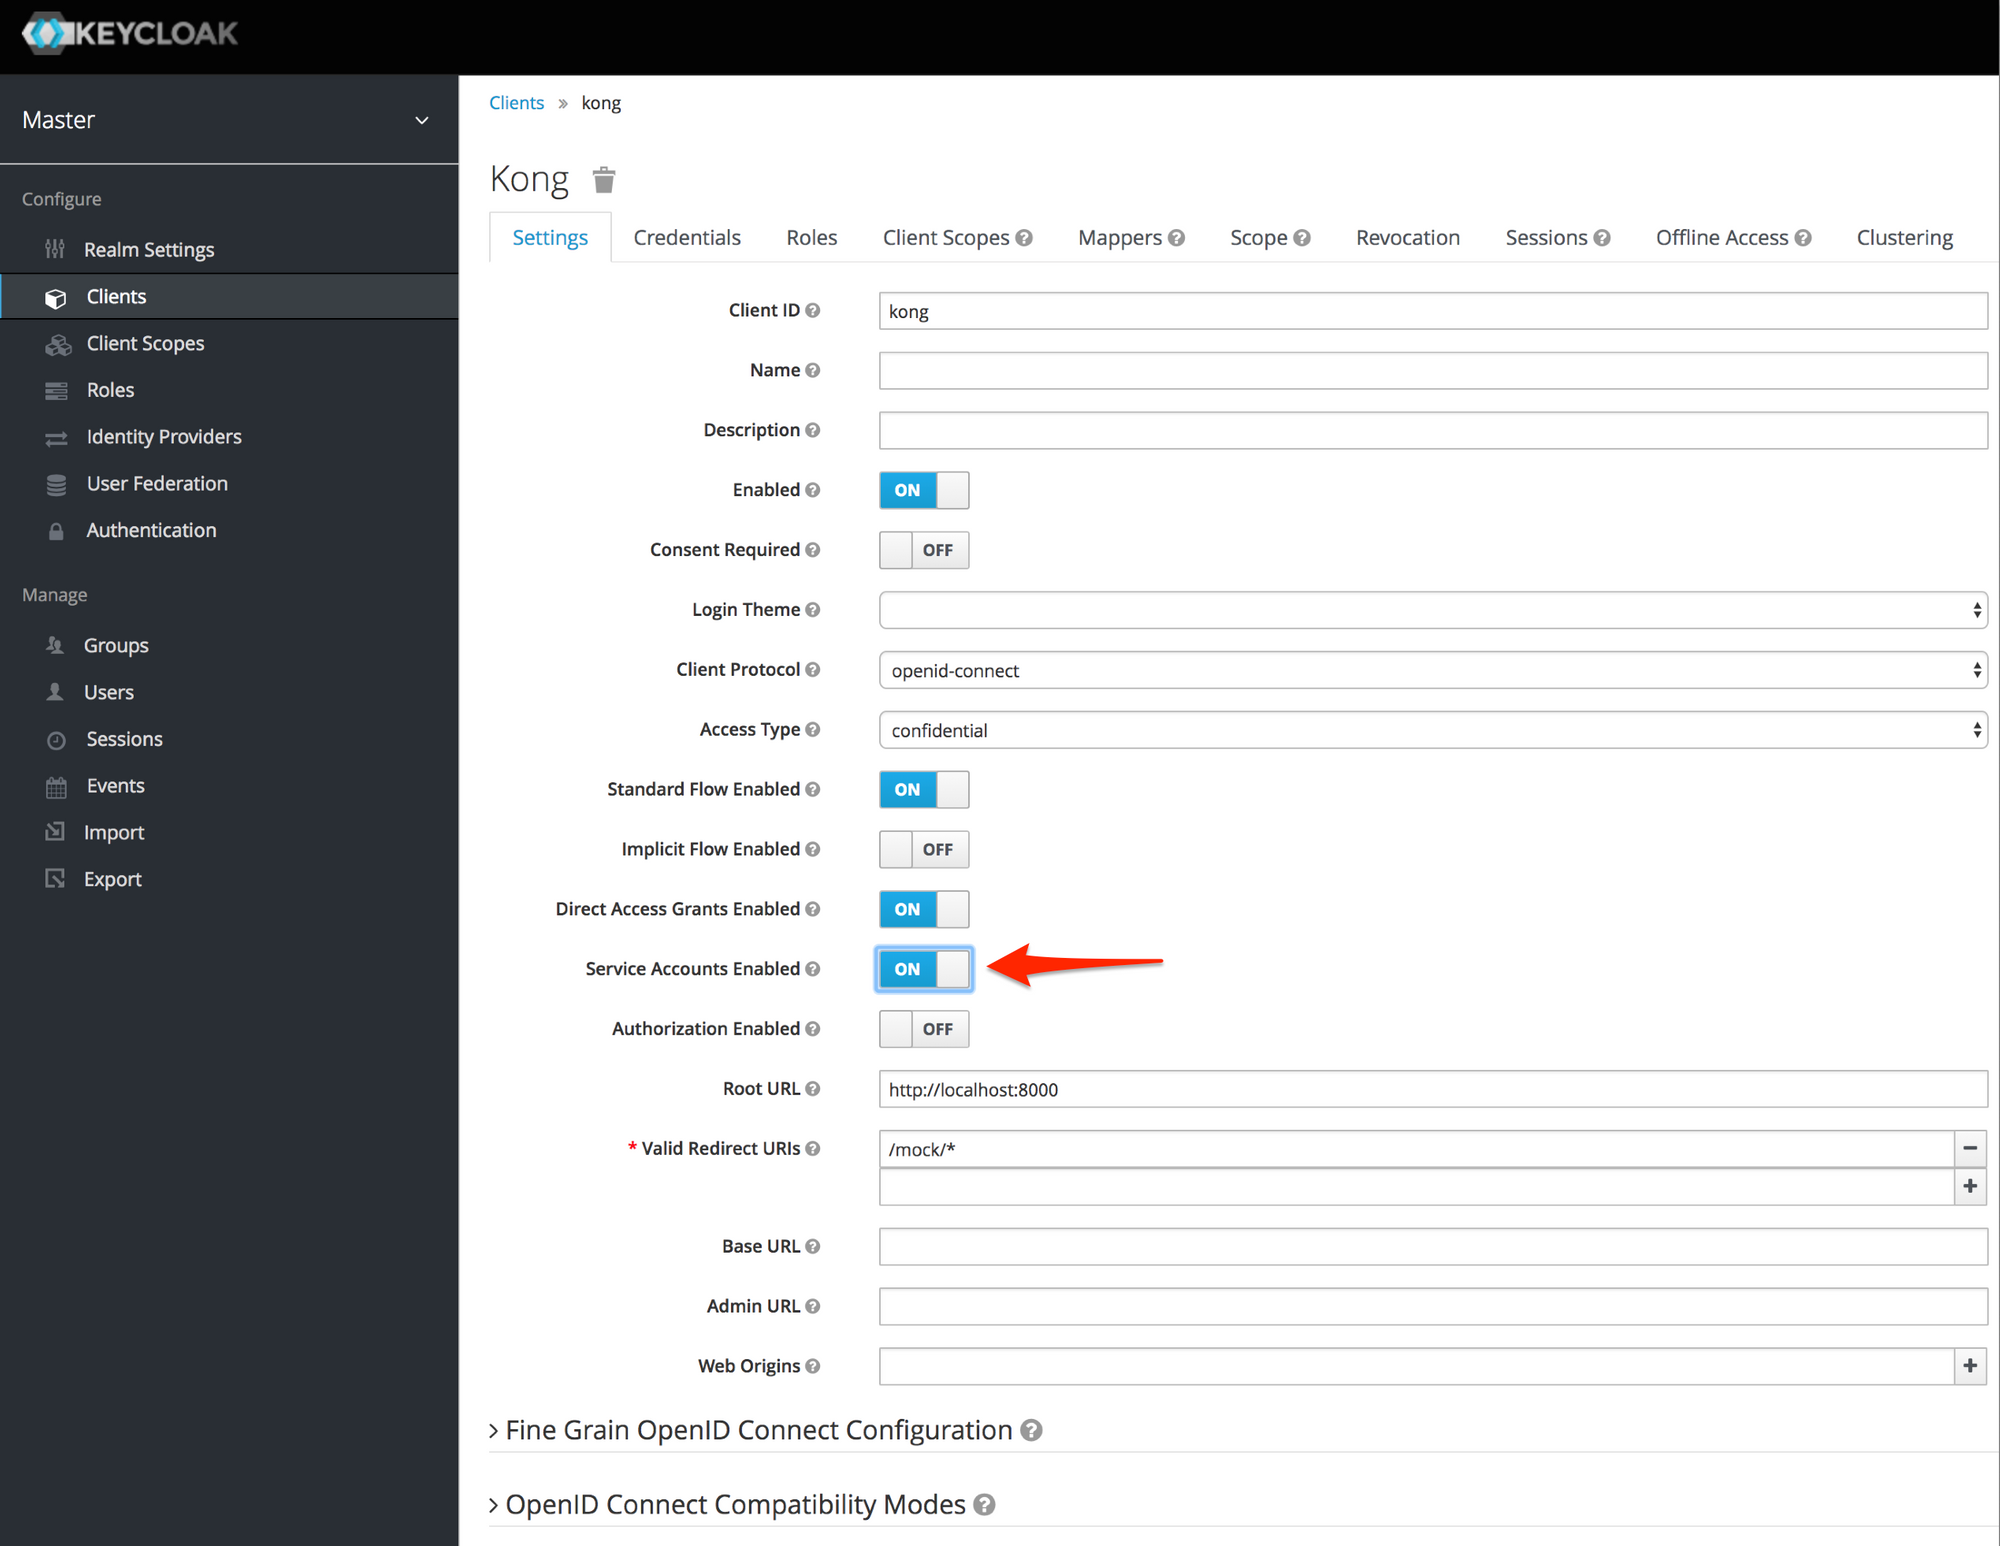
Click the "Save" button at the bottom of the page. While we're here, click the "Credentials" tab towards the top of the page and record the client secret that you see there, as we will need it for the next step.
What we're going to do next is see if we can partially replicate what we've experience on iOS in the terminal (i.e., get an access token, and try to use it to access an API behind Kong). Go ahead and open your terminal. First, we will request an access token using the same URL that our iOS app would:
$ CLIENT_SECRET=<client-secret-from-earlier>
$ ACCESS_TOKEN=$(curl -s http://localhost:8180/auth/realms/master/protocol/openid-connect/token \
  -d grant_type=client_credentials \
  -d client_id=kong \
  -d client_secret=${CLIENT_SECRET} \
  | jq -r .access_token)
$ echo $ACCESS_TOKEN
eyJhbGciOiJSUzI1NiIsInR5cCIgO...
Now that we have the access token, like the app would, we want to emulate Kong trying to validate this access token. In order to make sure this is accurate, we need to use the introspection endpoint that we configured for the OIDC plugin. Let's get a hold of that:
$ curl -s http://localhost:8001/plugins | jq .data[0].config.introspection_endpoint
"http://192.168.2.4:8180/auth/realms/master/protocol/openid-connect/token/introspect"
Go ahead and record the host that came back from the command (192.168.2.4, in this case). Note that the host that I got back from that request (192.168.2.4) will likely be different from yours. Next, let's assign that to a variable, then try to validate the access token:
$ KONG_TO_KC_HOST=<host-from-previous-response>
$ curl -s -X POST http://${KONG_TO_KC_HOST}:8180/auth/realms/master/protocol/openid-connect/token/introspect \
  -d token=${ACCESS_TOKEN} \
  -d client_id=kong \
  -d client_secret=${CLIENT_SECRET} \
  | python -mjson.tool
{
    "active": false
}
So far so good! We've been able to partially replicate what's going on. So the question is: why does Keycloak think the token is invalid? We JUST got the token, so it's likely not expired.
As it turns out, Keycloak checks to make sure the following are the same:
- The host in the URL used to request the token (i.e., the host in
kIssuerfor our mobile app) - The host in the URL used to validate the token (i.e., the host in the introspection endopint for the OIDC plugin)
Above, and in our mobile app code, when requesting the token, localhost is used. However, the OIDC plugin for Kong has an IP address configured for the introspection endpoint. Even though localhost and that IP address will get us to the same location, Keycloak will say the token is inactive because the host names do not match. Let's try it again, this time, w/ the same hostname:
$ HOST=localhost
$ ACCESS_TOKEN=$(curl -s http://${HOST}:8180/auth/realms/master/protocol/openid-connect/token \
  -d grant_type=client_credentials \
  -d client_id=kong \
  -d client_secret=${CLIENT_SECRET} \
  | jq -r .access_token)
$ curl -s -X POST http://${HOST}:8180/auth/realms/master/protocol/openid-connect/token/introspect \
  -d token=${ACCESS_TOKEN} \
  -d client_id=kong \
  -d client_secret=${CLIENT_SECRET} \
  | python -mjson.tool
{
    "acr": "1",
    "active": true,
    "allowed-origins": [],
    "aud": "kong",
...
Great, our token was successfully verified! Now we need to make the appropriate adjustments to our setup. Remember: the host in the URL used to request an access token needs to be the same as the host used in the URL to verify the token. How should we approach this?
Using localhost in both cases, like we did above, seems like a good choice at first. However, remember that localhost from a container refers to the container itself, and not the host OS. So if we configure the discovery endpoint, or the introspection endpoint for the OIDC plugin to use localhost as the host, the respective requests will never leave the container. We could go the route of using IP addresses, but that would be inflexible. In a production environment, we'd likly have a DNS entry or something similar for Keycloak so that we could access it from anywhere with the same hostname. We can get close to this functionality locally by editing the local /etc/hosts file to add an entry for keycloak-host, and use docker-compose's extra_hosts config to add an entry to the /etc/hosts file of the Kong container when is created.
Go ahead and run the following command to add your add your keycloak-host to your local /etc/hosts file:
$ LOCAL_IP=<your-local-ip>
$ sudo echo '${LOCAL_IP} keycloak-host' >> /etc/hosts
Next, add the following to your kong service in your "docker-compose.yml" file, making sure to replace the placeholder:
kong:
  ...
  extra_hosts:
    - "keycloak-host:<your-local-ip>"
  ...
Now let's restart our stack and make sure the changes are there:
$ docker-compose down
$ docker-compose up -d
$ docker-compose exec kong cat /etc/hosts | grep keycloak
Let's edit our Kong OIDC configuration to use the new host name
$ PLUGIN_ID=$(curl -s http://localhost:8001/plugins | jq -r .data[0].id)
$ curl -s -X PATCH http://localhost:8001/plugins/${PLUGIN_ID} \
    -d config.introspection_endpoint=http://keycloak-host:8180/auth/realms/master/protocol/openid-connect/token/introspect \
    -d config.discovery=http://keycloak-host:8180/auth/realms/master/.well-known/openid-configuration \
    | python -mjson.tool
Finally, we need to get back to our mobile application and modify the "AppAuthExampleViewController.swift" again. This time, modify the kIssuer variable:
let kIssuer: String = "http://keycloak-host:8180/auth/realms/master";
Because the mobile app is now reaching out to another host besides localhost, we need to add that host to the NSExceptionDomains in the "Info.plist" file:
You can add this under the entry for localhost:
<key>keycloak-host</key>
<dict>
    <key>NSIncludesSubdomains</key>
    <true/>
    <key>NSTemporaryExceptionAllowsInsecureHTTPLoads</key>
    <true/>
</dict>
Run the app, authenticate, then click the "Get Data" button, and you should see your request go through successfully!
Make sure to go back and turn off service account usage for the Kong client in Keycloak
Conclusion
This post brings to end the 2-part blog post on setting up OIDC on Kong and Keycloak so that it works with mobile applicaitons. While this setup is nowhere near production-ready, we do have a stack that allows us to develop applications around this functionality, while also allowing other developers to use the same stack locally. If you'd like to optimize local development among multiple developers, you'll want to do a few things like extracting placeholder values into a ".env" file from our "docker-compose.yml" (info here), and probably creating some tooling around Kong so that you don't need to use curl commands for everything, as well as tooling around automatic localization of your configuration. You can find the final code for the stack on my GitHub here.