Securing APIs with Kong and Keycloak - Part 1
Learn how to configure a Kong API Gateway with the OIDC Plugin and Keycloak to secure your APIs.

Introduction
Lately, I've been working on building infrastructure to implement OpenID Connect/OAuth2.0 in an API Gateway architecture using mostly open source or free software. Particularly, I'm interested in how this can be used in conjunction with mobile applications. In this post, I'll share with you what I've learned throughout the process. I'll be using Kong, Keycloak, and AppAuth. If you're not familiar with these technoligies here's a very brief overview:
- Kong - An API Gateway (community edition is open source and free)
- Keycloak - A OpenID Connect Provider (OP)
- AppAuth - Native App SDK for OAuth 2.0 and OpenID Connect
I will also be using Docker Compose to build the infrastructure. Please keep in mind that the following configuration is suitable for local development purposes only. This is a prototype. All apps will be communicating via HTTP. This will allow us to easily inspect network traffic with Wireshark. I will not be covering the steps you need to take to secure your network.
This post is broken up into three parts. In the first part, we will setup Kong and Keycloak so that they can work together to protect a backend server that we try to access from a web browser through Kong. In the second part, we will create a simple mobile application. Finally, in the third part, we will get them all working together.
This is a dense post, so grab your beverage of choice and get comfortable!
Assumptions
- Running on Mac, or Linux (though this can all be adopted for Windows easily enough since we're using Docker).
- Mobile app is iOS, so you will need xCode. If you'd like to see an Android version of this, please leave a comment below stating so.
- You're familiar with the terminal, and understand how
curland pipes work. - Docker Compose is installed
- (Optional) jq is installed
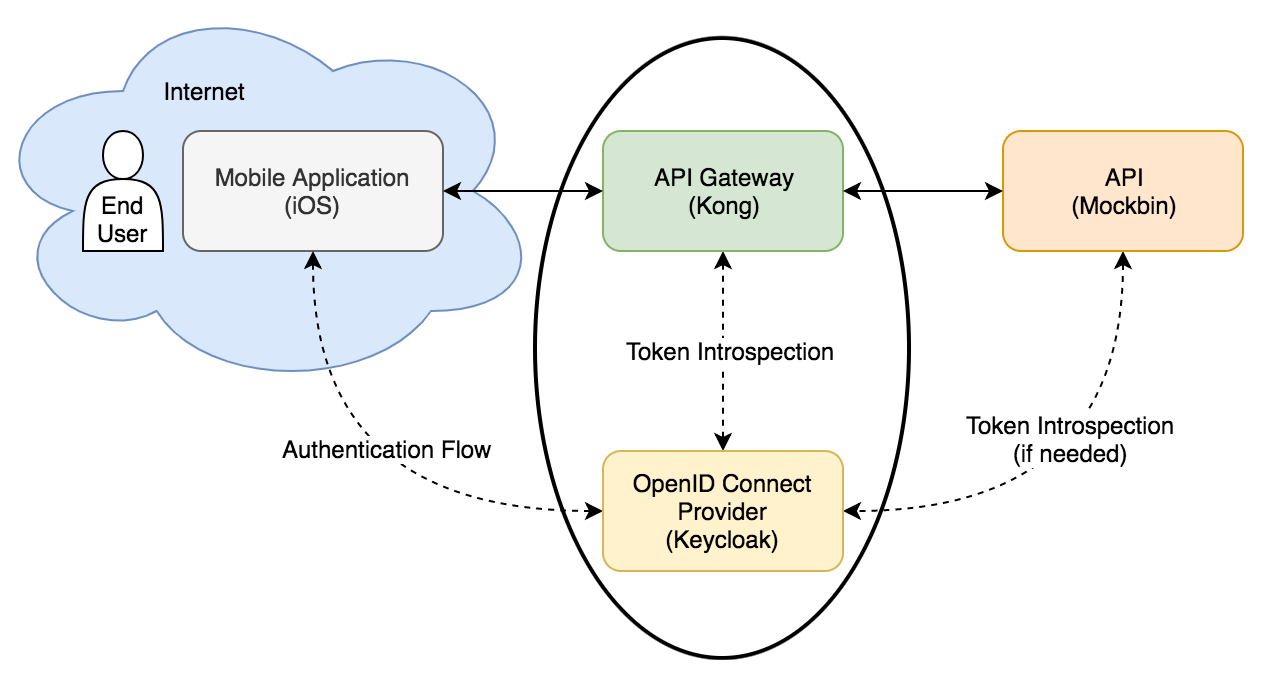
Overview
Below is a diagram of what we're trying to accomplish:
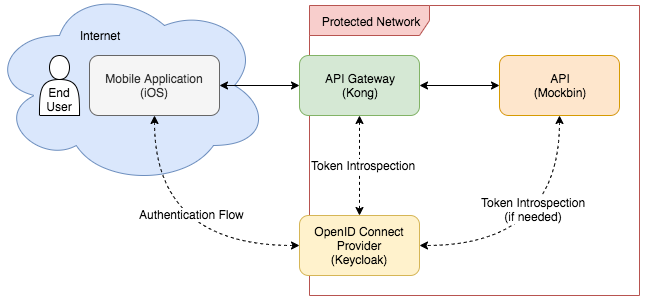
We'll flesh out this diagram in the next post with how the applications communicate with each other, and the order in which they do it to implement OIDC. First, pick a base directory and create a child directory where we'll store the code for our infrastructure:
$ mkdir api-gw-infra
$ cd api-gw-infra
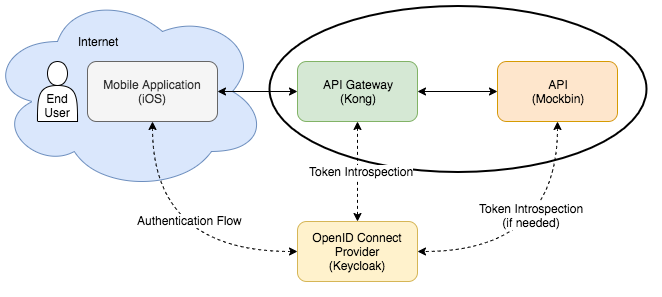
Setting Up The API Gateway
This section focus on setting up the Kong API Gateway, as well as the configurations necessary to access our backend API through the proxy. The areas of interest for this section are circled below:
We'll be running through the following steps in this section:
- Create a Dockerfile for our Kong image with the kong-oidc plugin
- Build the aforementioned image
- Create a
docker-compose.ymlfile for our kong and kong-db services - Spin up the kong-db service
- Run the migrations
- Spin up the kong service
- Verify the kong-oidc plugin is available
- Create the service and route necessary to hit mockbin.org
- Verify Kong is running well
Create the Modified Docker Image for Kong
First, we need to create the image that we're going to use for Kong. With this image, we need to have the kong-oidc plugin installed. We can do this one of two ways (that I'm aware of):
- Modify an existing, running container and commit the changes
- Create a Dockerfile and build the image from that
We'll be using step 2.
Let's create a Dockerfile:
$ mkdir -p docker/kong
$ touch docker/kong/Dockerfile
Open the file with your favorite text editor and populate it with the following contents:
FROM kong:0.14-centos

LABEL description="Centos 7 + Kong 0.14 + kong-oidc plugin"

RUN yum install -y git unzip && yum clean all

RUN luarocks install kong-oidc
This will install the kong-oidc plugin on the the kong:0.14-centos image. Build the image:
$ docker build -t kong:0.14-centos-oidc docker/kong/
You will see a warning like Warning: The directory '/root/.cache/luarocks' or its parent directory is not owned by the current user. You can ignore it.
Configure Kong
Next, create a docker-compose.yml file.
$ touch docker-compose.yml
Open this file with your favorite text editor and add the following:
version: '3.4'

networks:
  kong-net:

volumes:
  kong-datastore:

services:
  kong-db:
    image: postgres:9.6
    volumes:
      - kong-datastore:/var/lib/postgresql/data
    networks:
      - kong-net
    ports:
      - "15432:5432"
    environment:
      POSTGRES_DB:       api-gw
      POSTGRES_USER:     kong
      POSTGRES_PASSWORD:

  kong:
    image: kong:0.14-centos-oidc
    depends_on:
      - kong-db
    networks:
      - kong-net
    ports:
      - "8000:8000" # Listener
      - "8001:8001" # Admin API
      - "8443:8443" # Listener  (SSL)
      - "8444:8444" # Admin API (SSL)
    environment:
      KONG_DATABASE:         postgres
      KONG_PG_HOST:          kong-db
      KONG_PG_PORT:          5432
      KONG_PG_DATABASE:      api-gw
      KONG_PROXY_ACCESS_LOG: /dev/stdout
      KONG_ADMIN_ACCESS_LOG: /dev/stdout
      KONG_PROXY_ERROR_LOG:  /dev/stderr
      KONG_ADMIN_ERROR_LOG:  /dev/stderr
      KONG_PROXY_LISTEN:     0.0.0.0:8000, 0.0.0.0:8443 ssl
      KONG_ADMIN_LISTEN:     0.0.0.0:8001, 0.0.0.0:8444 ssl
      KONG_PLUGINS:          oidc
Now spin up the kong-db service with the following command. The -d flag tells Docker Compose to run the process in the background:
$ docker-compose up -d kong-db
Verify the service is running (make sure State is "Up"):
$ docker-compose ps
Now we will run the migrations on the kong-db service. The following command will spin up a kong service, which will run the command kong migrations up. Due to the --rm flag, this service will be torn down after the command is run.
$ docker-compose run --rm kong kong migrations up
Finally, we can bring up Kong, and check if it's healthy (make sure State is "Up"):
$ docker-compose up -d kong
$ docker-compose ps
Now let's check if we can hit Kong's admin API and see if the oidc plugin is available on the server
$ curl -s http://localhost:8001 | jq .plugins.available_on_server.oidc
This should return true. Please keep in mind moving forward that while the OIDC plugin is available on Kong at the moment, is has not been enabled, and is therefore not protecting any of the services we create.
Next, let's add the services and routes necessary to hit Mockbin from Kong:
$ curl -s -X POST http://localhost:8001/services \
    -d name=mock-service \
    -d url=http://mockbin.org/request \
    | python -mjson.tool
{
    "host": "mockbin.org",
    "created_at": 1542332952,
    "connect_timeout": 60000,
    "id": "e71c82d3-2e53-469b-9beb-a232a15f86d4",
    ...
}
This will output a JSON object with an id key. Record that value and use it for the next command as ${service_id}:
$ curl -s -X POST http://localhost:8001/routes \
    -d service.id=${service_id} \
    -d paths[]=/mock \
    | python -mjson.tool
{
    "created_at": 1542333285,
    "strip_path": true,
    "hosts": null,
    "preserve_host": false,
    ...
}
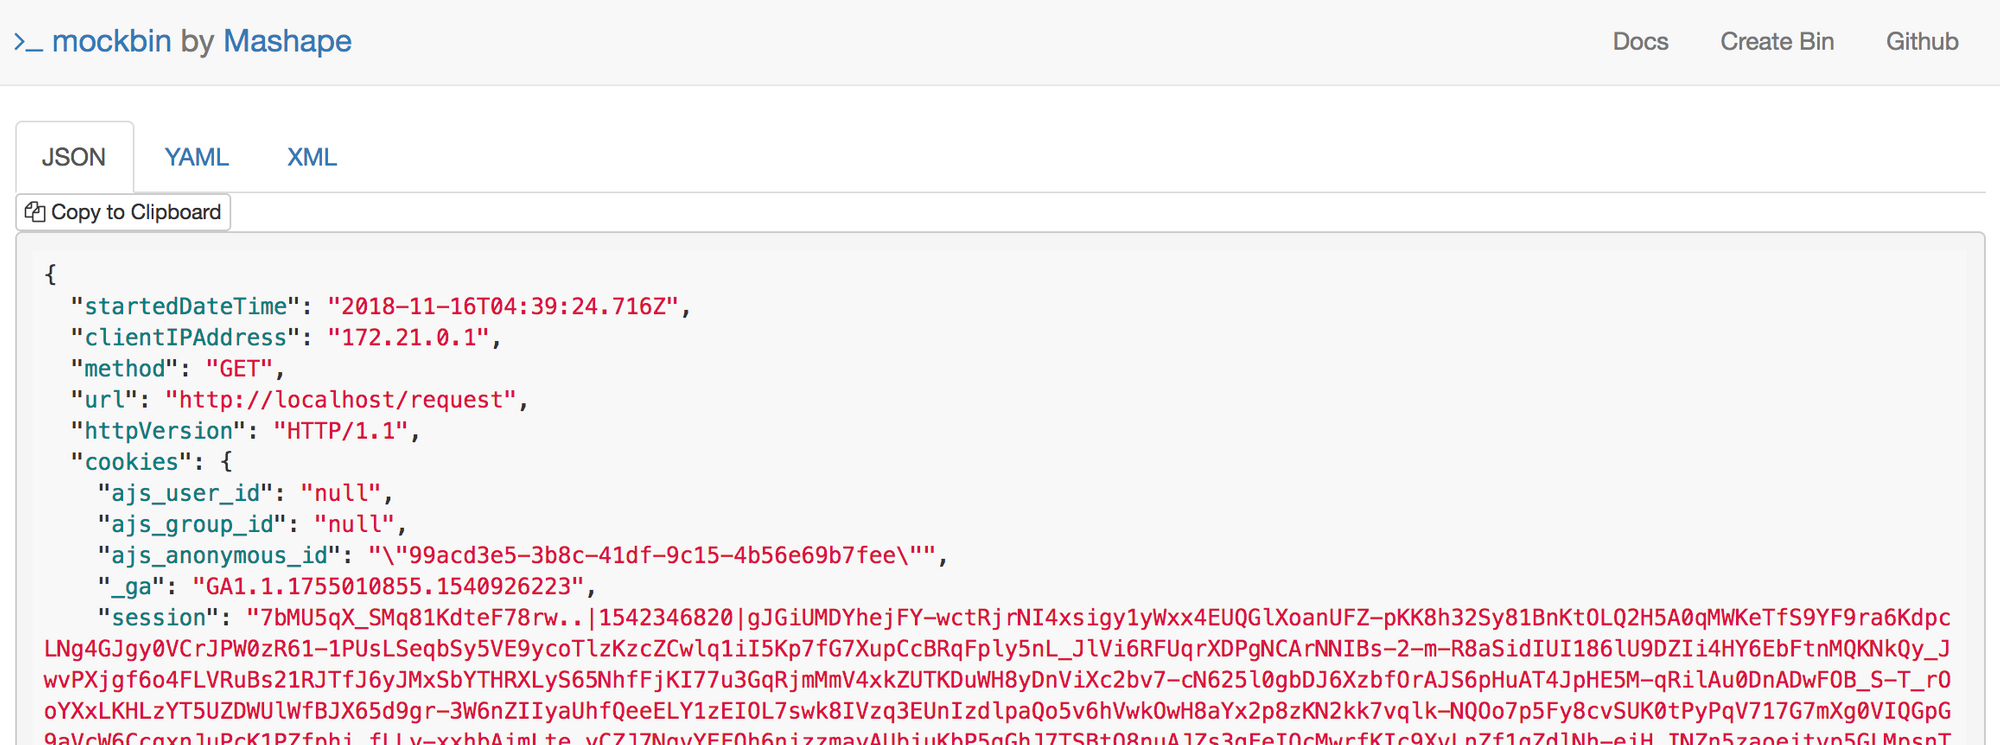
Finally, let's verify we've set everything up correctly:
$ curl -s http://localhost:8000/mock
{
  "startedDateTime": "2018-11-16T01:55:03.115Z",
  "clientIPAddress": "172.21.0.1",
  "method": "GET",
  "url": "http://localhost/request",
  ...
}
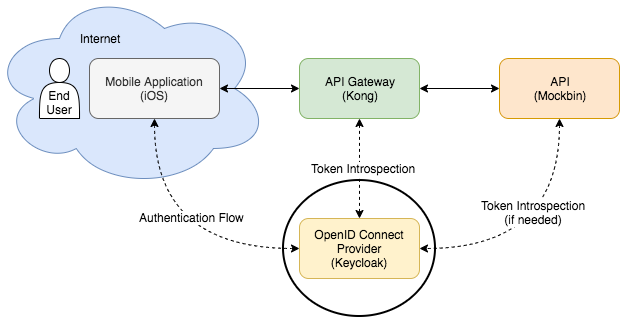
Setting Up Keycloak
This section will focus on setting up Keycloak. We will only be spinning up Keycloak using Docker Compose in this section. We will not be making sure it's working with Kong just yet. The areas of interest are circled below:
We'll be running through the following steps in this section:
- Modify the
docker-compose.ymlto include Keycloak and it's backend database. - Spin up the Keycloak database service
- Spin up the Keycloak service
- Login to Keycloak
- Add a Keycloak client for Kong
- Add a new user
Configure Keycloak
Open up the docker-compose.yml. Add a network and volume for Keycloak:
networks:
  kong-net:
  keycloak-net:

volumes:
  kong-datastore:
  keycloak-datastore:
Next, add the Keycloak database to services in the docker-compose.yml:
services:
  ...
  keycloak-db:
    image: postgres:9.6
    volumes:
      - keycloak-datastore:/var/lib/postresql/data
    networks:
      - keycloak-net
    ports:
      - "25432:5432"
    environment:
      POSTGRES_DB:       keycloak
      POSTGRES_USER:     keycloak
      POSTGRES_PASSWORD: password
Spin up the service:
$ docker-compose up -d keycloak-db
Verify the service is running (make sure State is "Up"):
$ docker-compose ps
Next, add Keycloak to services in the docker-compose.yml:
services:
  ...
  keycloak:
    image: jboss/keycloak:4.5.0.Final
    depends_on:
      - keycloak-db
    networks:
      - keycloak-net
    ports:
      - "8180:8080"
    environment:
      DB_VENDOR:   POSTGRES
      DB_ADDR:     keycloak-db
      DB_PORT:     5432
      DB_DATABASE: keycloak
      DB_USER:     keycloak
      DB_PASSWORD: password
      KEYCLOAK_USER:     admin
      KEYCLOAK_PASSWORD: admin
Finally, stand up your Keycloak service:
$ docker-compose up -d keycloak
Verify the service is running (make sure State is "Up"):
$ docker-compose ps
Add a Client to Keycloak
Finally, open up your web browser, and navigate to http://localhost:8180. You should see the Keycloak page:
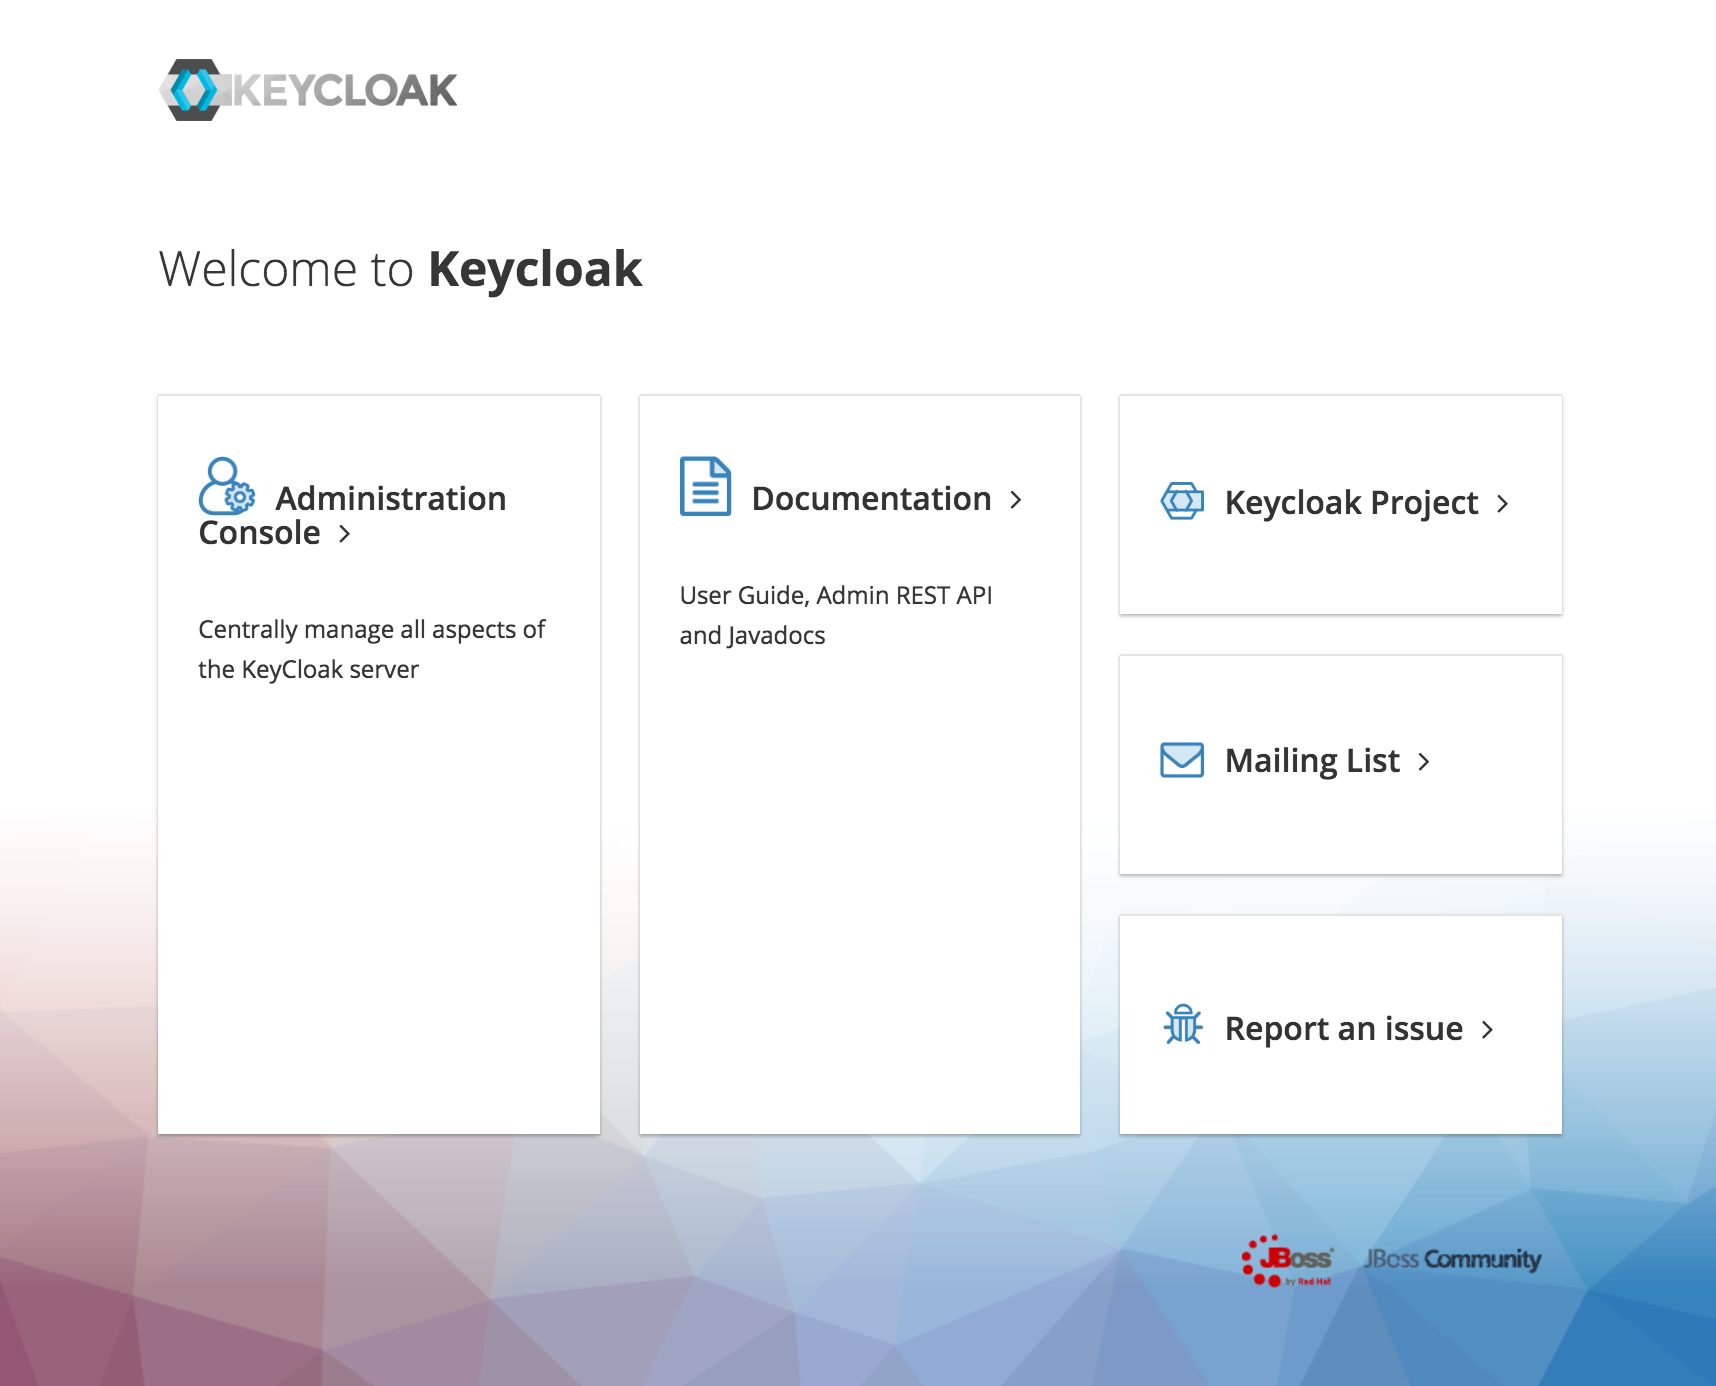
Click on the "Administrative Console" link. On the next page, type in your username and password (admin:admin) and login.
Once we're logged in, we need to do a couple things. First add a client, which will represent Kong, and second, add a user, which we can use to login and access resources that Kong is protecting.
By adding a client, we're basically telling Keycloak that it's ok that this particular device to interact with it. Any application that is dealing with authentication on behalf of the user is considered to be a client to Keycloak.
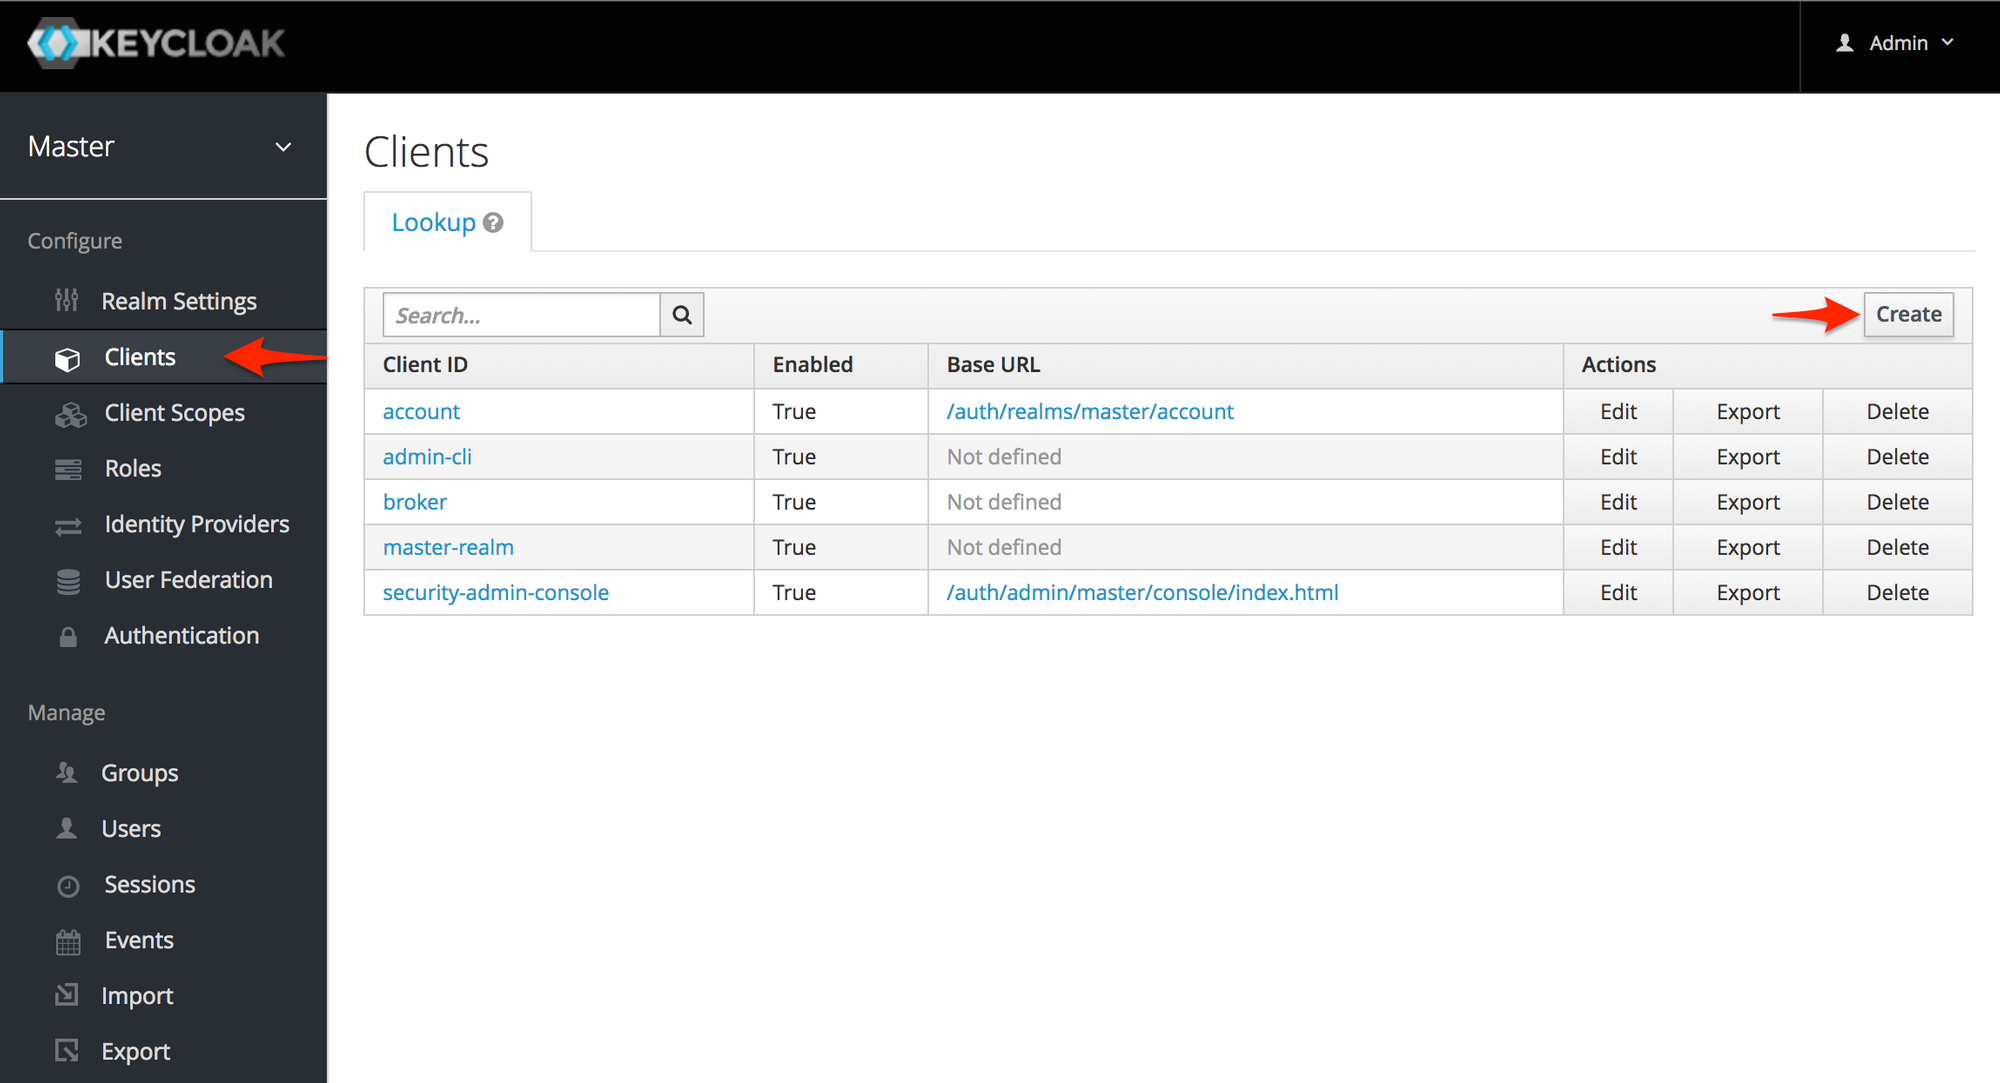
To add a client, click the "Clients" link in the sidebar, and then the "Create" button on the right side of the Clients page, as seen below:
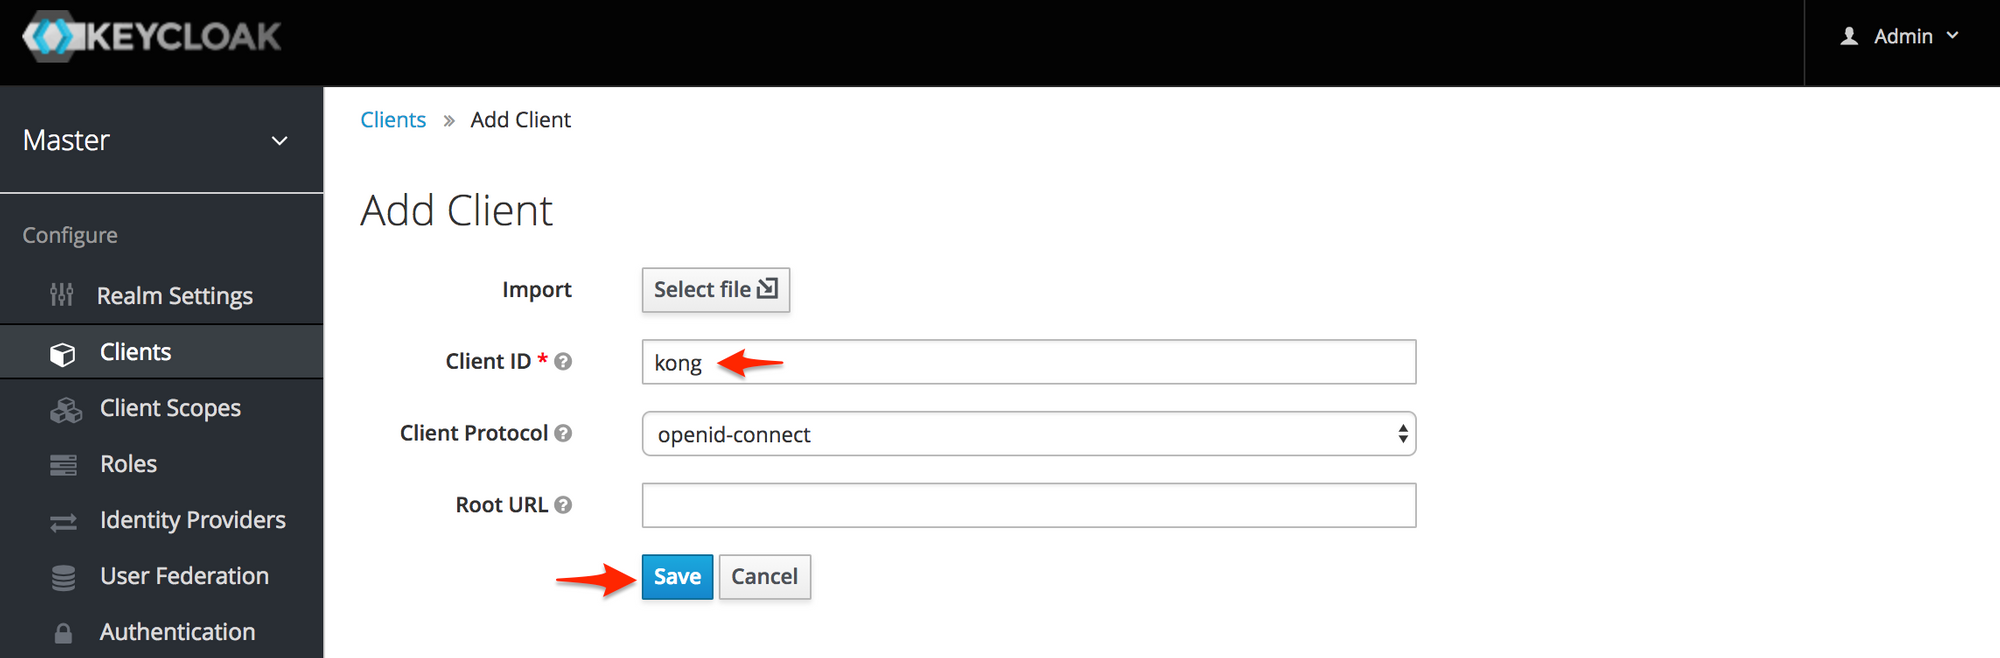
On the Add Client page that shows, fill in the "Client ID" as "kong" and click the "Save" button.
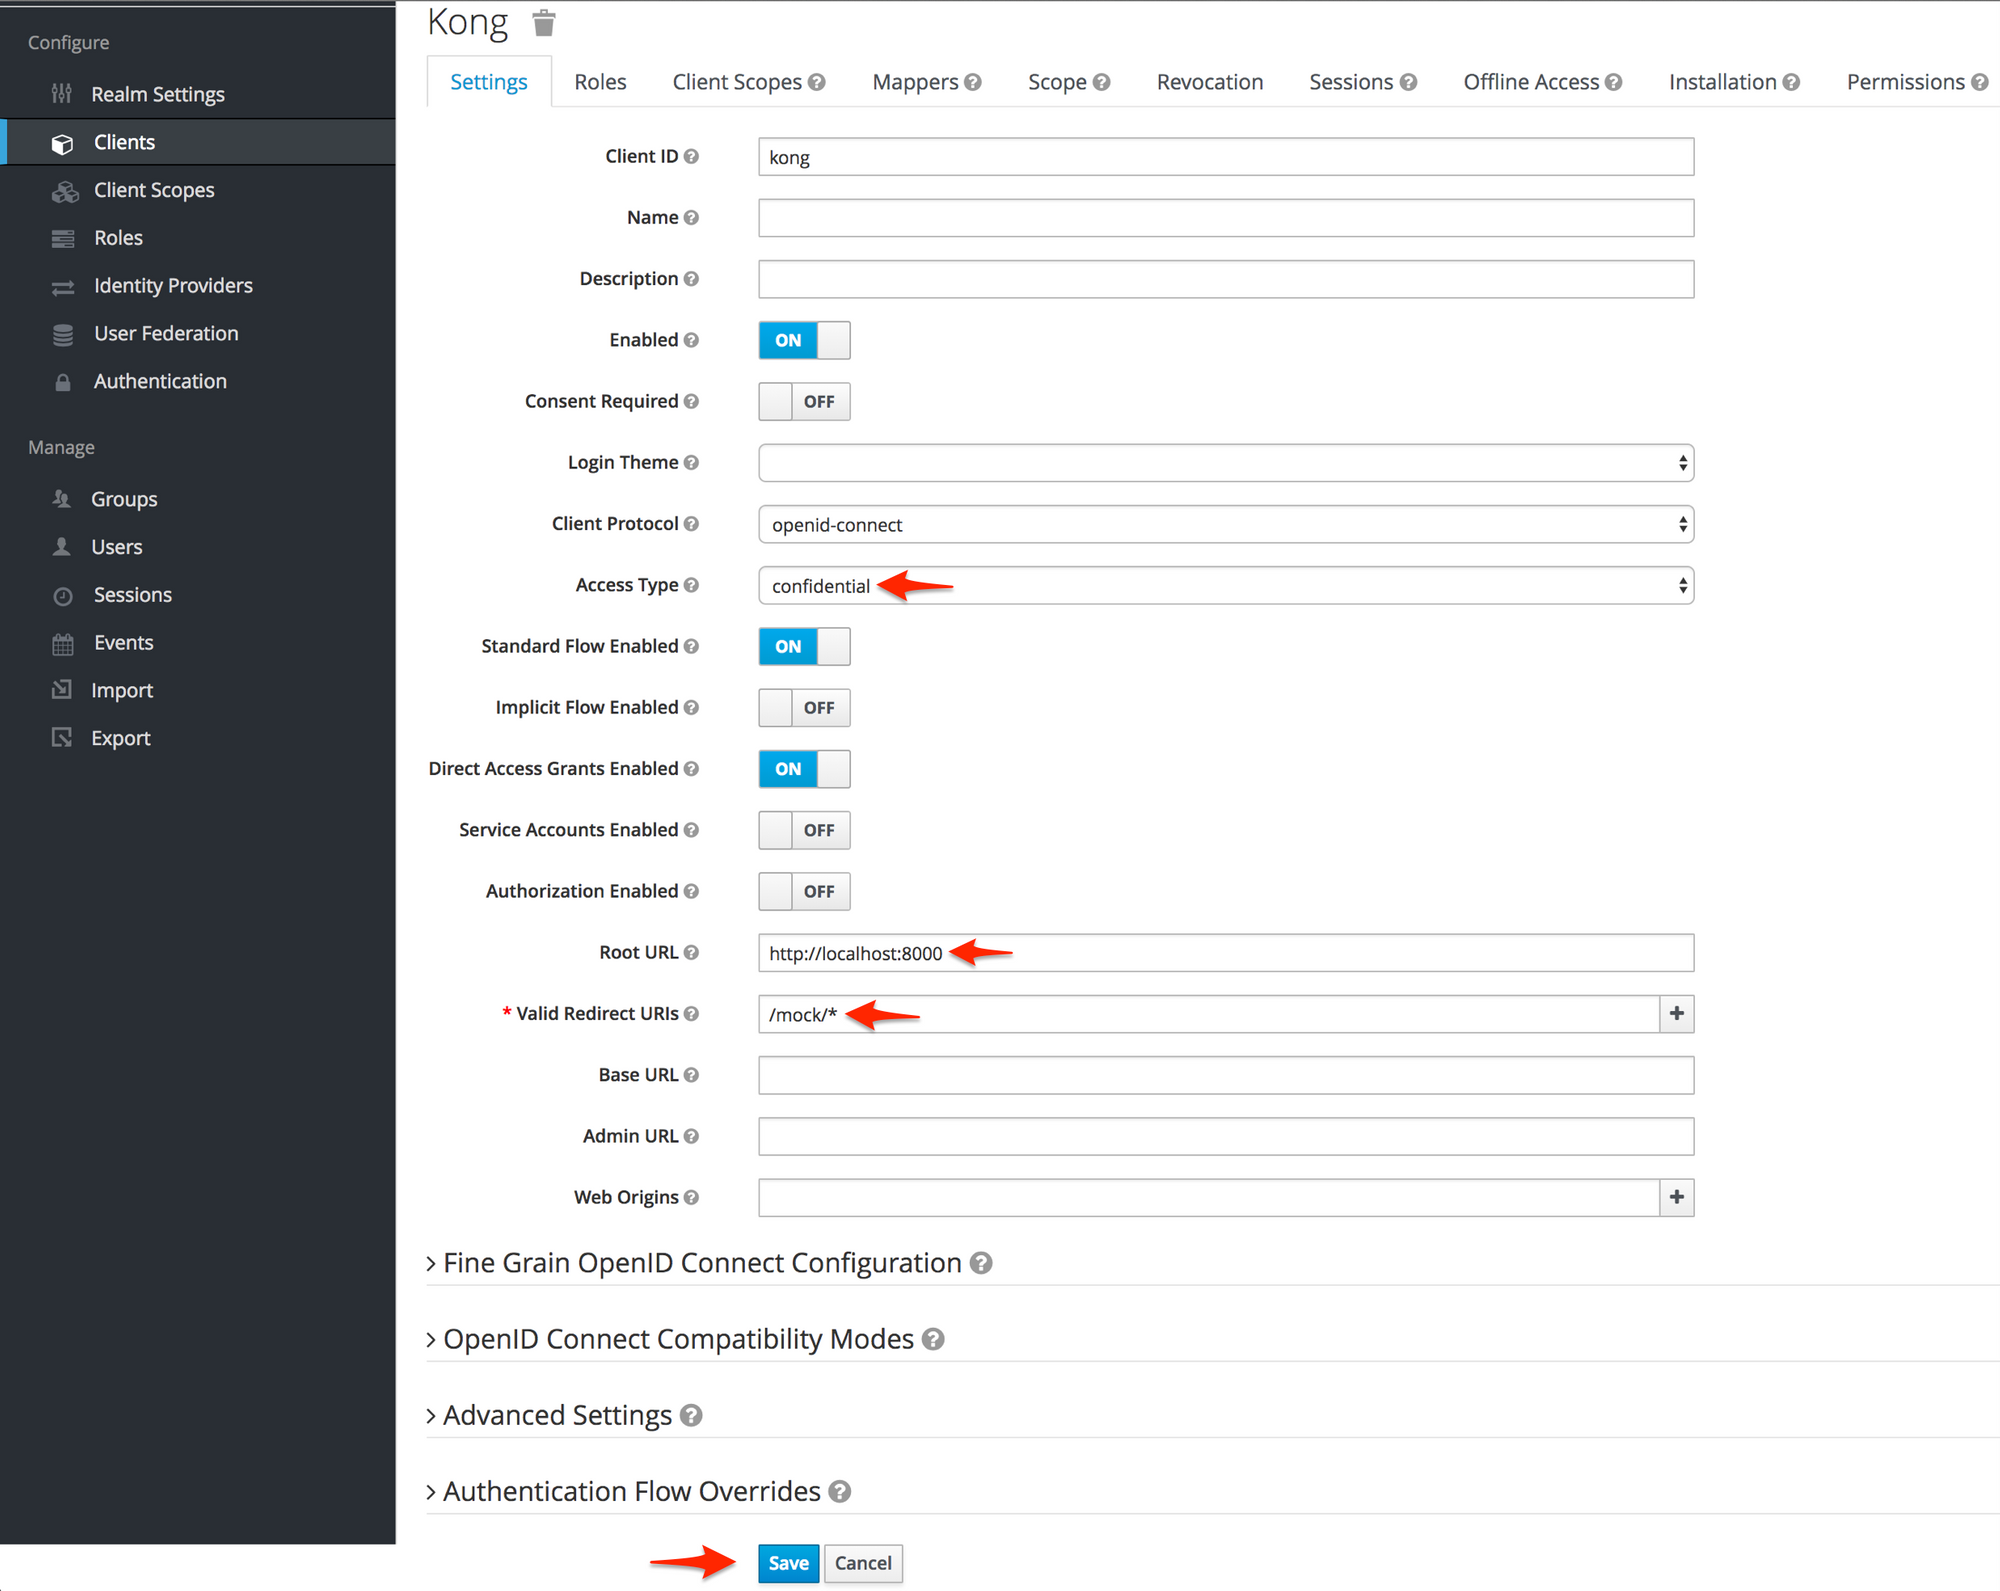
On the details page, set the "Access Type" to "Confidential", the "Root URL" to "http://localhost:8000" and the "Valid Redirect URIs" to "/mock/*" Click the "Save Button".
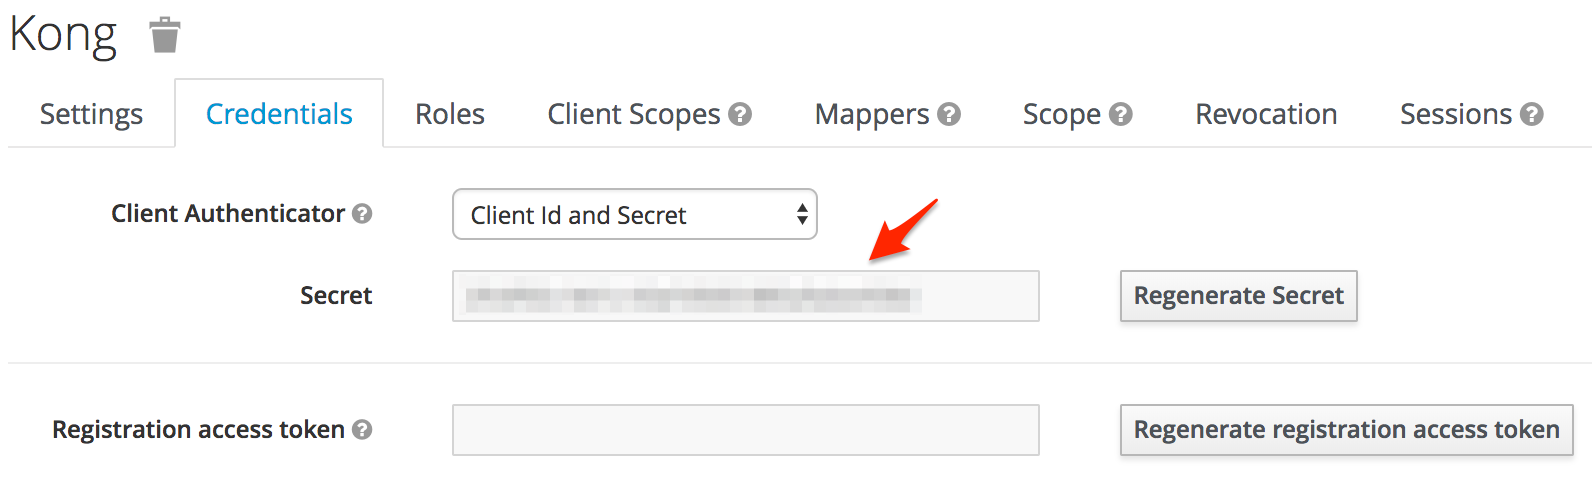
Once you save, a new tab, "Credentials" should appear on the details page. Click on that. Record the Client Secret. We will need it later.
Add a User to Keycloak
To add a user, click the "Users" tab on the left sidebar, then click the "Add user" button on the ride side of the window.
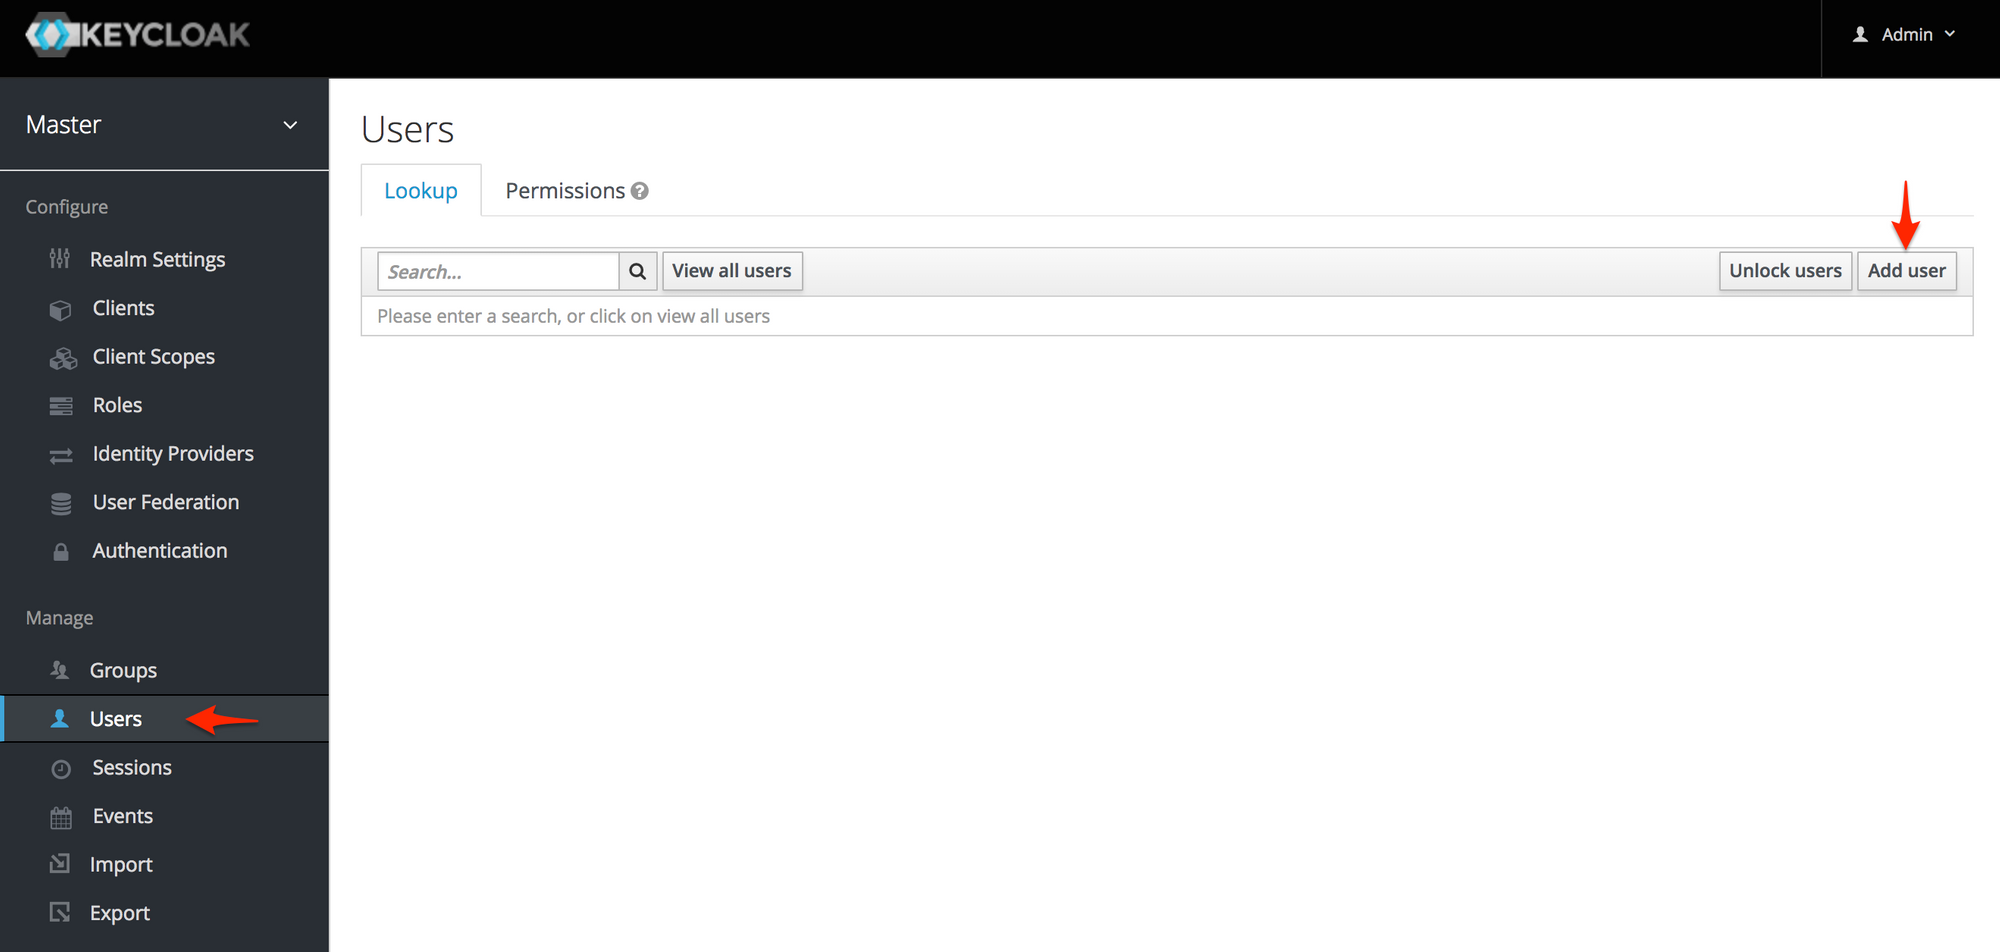
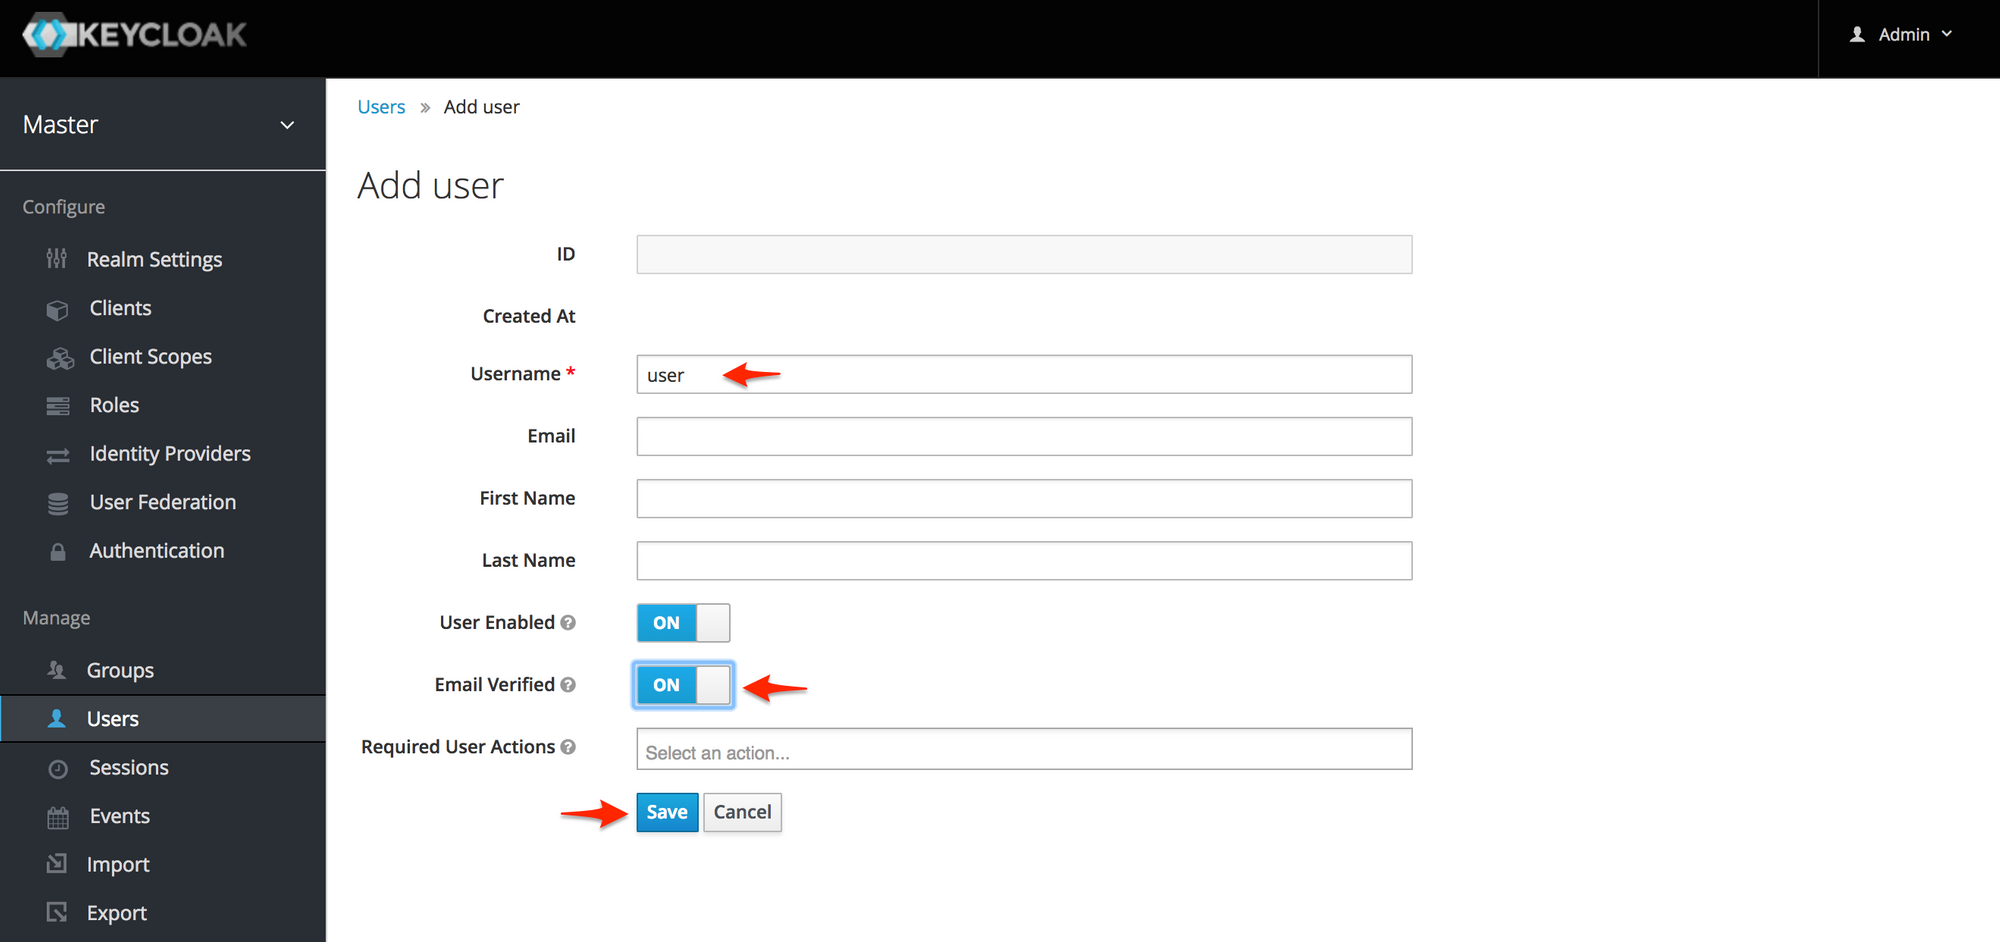
On the next page, set the "Username" to "user" and set the "Email Verified" switch to "On". Then, click the "Save" button.
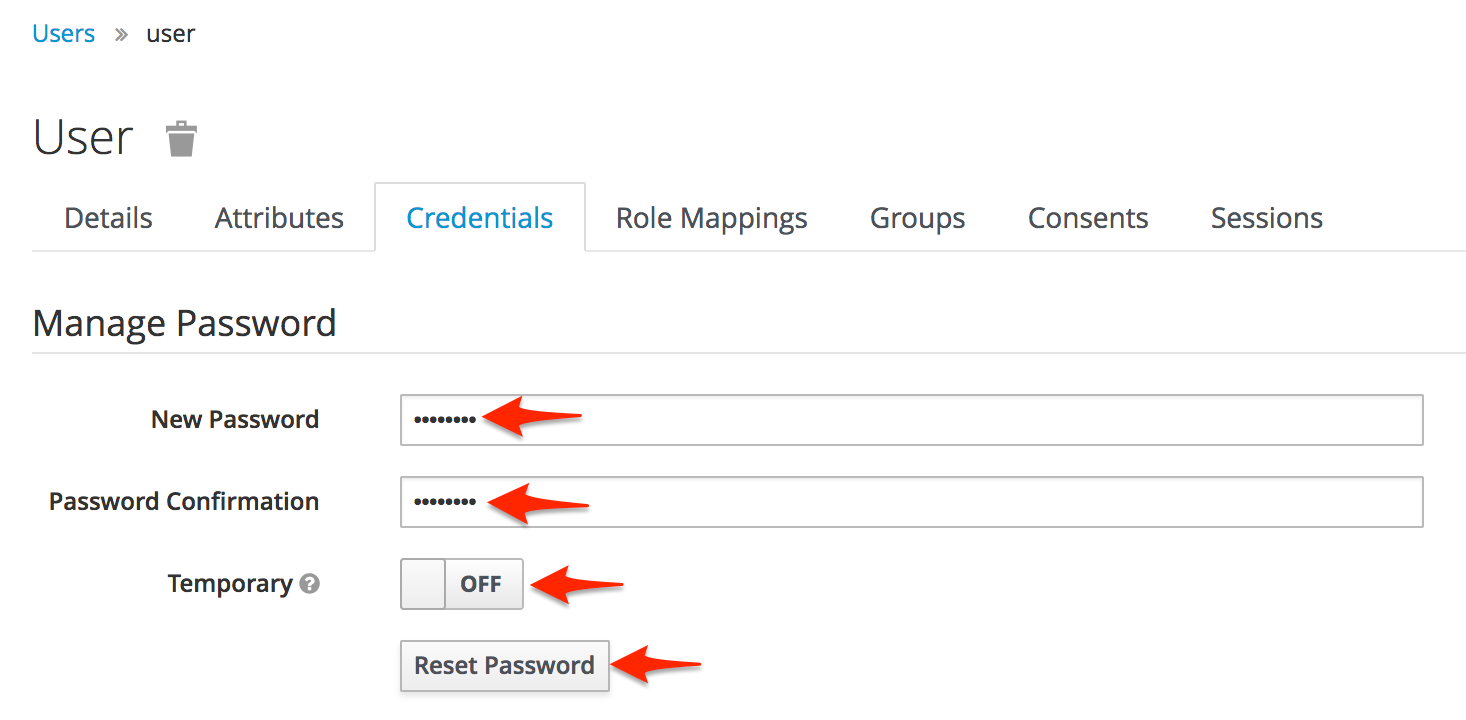
Click on the "Credentials" tab, and enter in a password, confirmation, and make sure the "Temporary" switch is set to "off". Then, click the "Save" button.
Setup Kong to work with Keycloak
Next, we will configure Kong to work with Keycloak. The areas of interest are circled below.
We'll be running through the following steps in this section:
- Configure the OIDC plugin on Kong
- Test the OIDC functionality with Kong as a client of Keycloak
To configure the OIDC plugin for Kong, we'll go through the Admin REST API, just like we did for adding our service and route. The OIDC plugin needs three pieces of information to hook up with Keycloak: the client ID, the client secret, and the discovery endpoint. The discovery endpoint is what the Kong OIDC plugin can hit in order to get informaiton on where it can do authentication, token introspection, etc. You can check it out yourself with the following command:
$ curl -s http://localhost:8180/auth/realms/master/.well-known/openid-configuration | python -mjson.tool
However, there's a bit of a trick to this. While we can access Keycloak using localhost, Kong will not be able to do the same. Since Kong is in a container, localhost will just hit the Kong container itself. Instead, we need to determine the IP address for our host, and use that for the discovery enpoint, isntead. You can find your IP address with the ifconfig command, but there are other ways as well.
$ HOST_IP=$(ipconfig getifaddr en0)
$ CLIENT_SECRET=<client_secret_from_keycloak>
$ curl -s -X POST http://localhost:8001/plugins \
  -d name=oidc \
  -d config.client_id=kong \
  -d config.client_secret=${CLIENT_SECRET} \
  -d config.discovery=http://${HOST_IP}:8180/auth/realms/master/.well-known/openid-configuration \
  | python -mjson.tool
{
    "created_at": 1542341927000,
    "config": {
        "response_type": "code",
        "realm": "kong",
    ...
}
And that's it! Now let's test it with the web browser. When you try to hit http://localhost:8000/mock, now, Kong should redirect you to log in to Keycloak. Log in as the user you created in Keycloak earlier, and you should be redirected to the original page you requested.
If you get the error: "accessing discovery url (http://localhost:8180/auth/realms/master/.well-known/openid-configuration) failed: connection refused" then you've likely set the discovery host incorrectly. Make sure the IP is valid and you're not using
localhost.
Conclusion
In this post, we've laid the groundwork necessary to configure mobile app authentication via OIDC on an API Gateway architecture using Kong and Keycloak. At this point, we can authenticate an end user on a web browser. In the next post, we will be able to authenticate users on a mobile device. You can find the source code for the tutorial up to this point on the browser-auth branch of this repository. Again, just a reminder that this setup is for development purposes only, and would need to be modified for a production environment. Please leave any questions or comments below. Thanks for reading!
EDIT: You can now find Part 2 here.